Build ASP.NET Web Pages using Razor Syntax

Microsoft Asp.Net framework is used to develop web applications, dynamic websites, and web services. There are basically 6 frameworks introduced by Asp, which is 1.0, 1.1, 2.0, 3.5, 4.0 and among them, 4.5 is the current and latest version of Asp. Every framework comes with advanced classes, methods, and types so the programmers can produce unique things using the features of these frameworks. Let me guide you through all the basics of Asp.Net before we dive into building an application using Asp.Net
About MVC
MVC, a software architecture pattern, separates the development of application into three components namely Model, View & Controller. Let me tell you what they are about and what they actually do
Model: Manages the entity definition, data access and business logic of the application
View: Represents the UI, and where the user can see information provided by the model.
Controller: Controls the interaction and communication between Model & View
About C#
C#, an object-oriented programming language, developed by Microsoft as a part of the .Net framework.
About Razor
Released by Microsoft for VS 2010 in January 2011, Razor Asp.Net programming syntax enables the programmers to write C# or Visual Basic code embedded in HTML page and used to create dynamic web pages.
Get free quote from professional Asp.Net Developer about your project.
About Visual Studio
Visual Studio is an IDE (Integrated Development Environment) used to create windows form applications, websites, web applications and web services. It supports a variety of programming languages including C#, C++, Python and Ruby.
Let’s start building Web Application Using Asp.Net
So we now know about these software development technologies, let’s create your first web application.
1- Open Visual Studio 2012, go to “File/New” menu and click on “Project”. A window like below will open
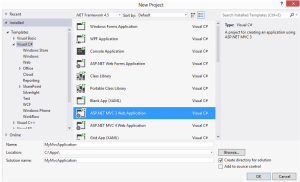
2- In this window, select within the Visual C# options, ASP.NET MVC 3 Web Application.
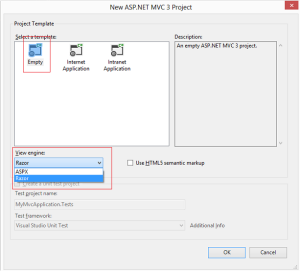
3- Then in the next window, select the template “Empty”, and “Razor” as View engine, and then click Ok.
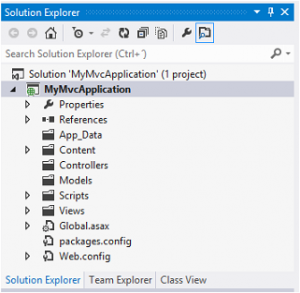
You can now see web application project created with the required folders Models, Views & Controllers also the reference, app data, scripts and other files.
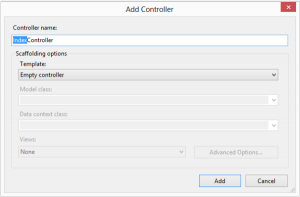
4- Right-click on the folder “Controllers” and “Add/Controller” and you’ll see a window, enter the name of your controller. For e.g. “Index”, and for the template option, leave Empty Controller. Don’t remove the suffix “Controller” in the controller name because it’s showing that this one is a controller class.
5- Now, right-click on the folder “Models” and select Add/Class. Name this class as you like because this will be the Entity to show in the View. We name it “IndexModel” (the name doesn’t have to include the word “index”). Then, add some properties to the class. For example add ID, Description and Comments properties.
using System;
using System.Collections.Generic;
using System.Linq;
using System.Web;namespace MyMvcApplication.Models
{
public class IndexModel
{
public int ID { get; set; }
public string Description { get; set; }
public string Comments { get; set; }}
}
6– Right-click on the folder “Views” and create a new folder named “Index” (as the controller). Then right-click on that folder and select Add/View. Name the view as “Index” also and as a result, we’ll have a new “Index. cshtml”.
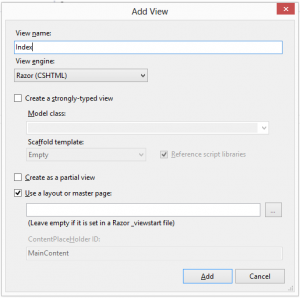
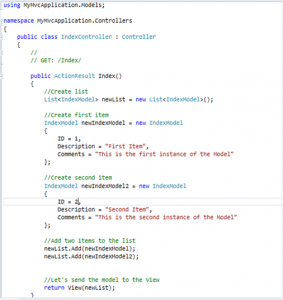
7- Now we have added Model, View, and Controller. Let’s add some code to the controller which will be like this.
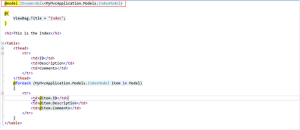
8-Now add some code to the view which will look like this.
9- Run the Project on any internet browser, and make sure you add to the URL the action “Index”.
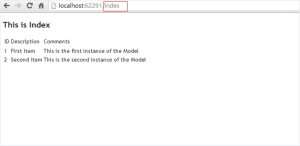
That’s it! You have built the first MVC Application with ASP.NET, using C# and Razor. It’s is the most basic and simple way in order to learn and create your very first web application using Asp.Net with Razor syntax. Hope it helps you in understanding the easiest way to develop Asp.Net Web Application.
Latest posts by Moiz Khan (see all)
- How to Use AI to Enhance your SEO Strategies? - August 31, 2023
- What You Need to Know About Test Automation in DevOps - August 30, 2023
- 6 Cloud Computing Challenges That Businesses Need to Be Aware of - August 22, 2023

 Careers


