Latest Blogs
Web Development
Aaqil Abdul Rehman
Oct 23, 2026

PHP Security Vulnerabilities CVE-2026-109618 and CVE-20...
The Short Version:
Two critical PHP security vulnerabilities, CVE-2026-109618 and CVE-2026-109619, let an attacker run code on a PHP website with one crafted web request and no login. Here is the state of play:
The schedule was decided by a leak. On 20 October 2026, details of two unpatched PHP security vulnerabilities surfaced online ahead of the coordinated disclosure date. The PHP security team posted an advance notice that evening and moved the release forward, saying it could ship even earlier if active exploitation appeared.
On 21 October at 14:00 UTC, PHP published the advisory and released 8.5.12, 8.4.27, 8.3.36 and 8.2.35. The GitHub advisories went live 26 minutes before the announced time. Fixed Windows builds appeared on downloads.php.net at 13:47 UTC.
The bugs were found in August 2026 by the researcher Calif, with Wiz Research and OpenAI reporting independently. Calif filed the first report to PHP on 11 August. Sansec traced the vulnerable code back to PHP 5.4.0, which shipped in 2012, so this is roughly fourteen years of exposure.
CVE-2026-109618 abuses PHP’s memory limit. While PHP sets up an incoming request, it marks some internal state as ready before every allocation it needs has succeeded. Send a request big enough to exhaust the memory limit and PHP gets interrupted partway through, leaving that state half built and never rolling it back. The cleanup routine then treats the leftover memory as valid, which is a use after free (CWE-416). From there an attacker can corrupt memory and run their own code. On top of that, the flaw can leak server memory back to the attacker.
CVE-2026-109619 works differently. Internal state tied to one request survives after its memory is freed, so a later request handled by the same worker picks up the stale data. Both end in the same place: remote code execution without credentials.
Severity ratings vary by setup. Red Hat rates CVE-2026-109618 Important rather than Critical for its own distributions, on the basis that standard Red Hat Enterprise Linux builds run PHP-FPM, whose workers exit on early initialization failures before reaching the corrupted structures. Red Hat says exploitation there is difficult in practice and usually needs non-default behaviour, such as parsing a second request body during script execution. That is a reason to check your own stack, not a reason to skip the PHP patch.
If PHP serves web requests anywhere in your stack, assume yes until you have checked the version. PHP says every installation serving web requests is at risk, including PHP-FPM, Apache with mod_php, php-cgi, FrankenPHP and LiteSpeed.
| PHP branch | Vulnerable | Fixed in |
|---|---|---|
| 8.5.x | Below 8.5.12 | 8.5.12 |
| 8.4.x | Below 8.4.27 | 8.4.27 |
| 8.3.x | Below 8.3.36 | 8.3.36 |
| 8.2.x | Below 8.2.35 | 8.2.35 |
| 8.1 and older, back to 5.4 | All versions | No fix. Upgrade to a supported branch |
Because the flaws live in the engine, the application on top does not protect you. Sansec reports that an attacker without a login can run code against stock installs of Magento 2.4.9, WordPress 7.1.2, Drupal 11.4.3, Joomla 6.1.4, MediaWiki 1.46.2, Roundcube 1.7.4, phpMyAdmin 5.2.3 and Nextcloud 35.0.1.
Run php -v on each server, and remember the places PHP hides: container images, staging boxes, cron workers, CI pipelines and old client sites nobody has touched in two years.
Reports conflict, which is normal this early. Amazon says its MadPot honeypot network logged the first exploit attempt on 17 October, four days before disclosure, with more on 21 October carrying varied payloads that it reads as several different actors. watchTowr reported exploitation across its own honeypots on 21 October. Cloudflare’s CTO described early attacks and the company pushed temporary WAF rules as a stopgap. Patchstack said it had confirmed multiple active incidents.
On the other side, CISA said it had not observed exploitation when it published its 21 October alert, and Huntress saw none in partner environments as of 20:30 UTC that day. Researchers speaking to CyberScoop described mostly reconnaissance, scanning to find out which servers are still exposed. As of 22 October, neither CVE had been added to CISA’s Known Exploited Vulnerabilities catalog.
The NSA was blunter: it expects attackers to weaponize both flaws, and CISA advises taking systems offline if they cannot be patched quickly. Sansec had predicted mass attacks within fifteen minutes of the release. Treat the quiet period as a head start, not an all clear.
Sites on PHP 8.1 or older cannot patch. The PHP project is not backporting fixes to end of life branches, so the only real answer is a migration to a supported version. CISA has issued separate guidance for unsupported PHP.
PHP’s advisory is clear that no configuration change fully mitigates either flaw. The settings below narrow the attack paths and each one costs you something. Set them in php.ini, the PHP-FPM pool config or the web server config, then still patch as soon as you can.
| Setting | What it blocks | What it costs |
|---|---|---|
| memory_limit = -1 | Removes the memory limit that CVE-2026-109618 relies on | A single request can consume all memory on the instance |
| session.upload_progress.enabled = 0 | The session path used in the demonstrated attack on CVE-2026-109619 | Session based upload progress stops working |
| fatal_error_backtraces = 0 | The backtraces CVE-2026-109619 uses on PHP 8.5 | Fatal errors no longer include a backtrace |
A WAF helps at the edge but will not fix the engine. If a server is internet facing, unsupported and unpatchable, CISA’s advice is to take it offline until it can be replaced.
Patching one site is an afternoon. Patching forty, across hosts, containers and client environments, with a few stuck on PHP 7.x, is a different problem.
Arpatech has been building and running PHP websites since 2003. Our web development, managed hosting and support teams can check which PHP version each of your sites is actually running, apply the patch, restart services properly, and map out a migration for anything left on an end of life branch.
Aaqil Abdul Rehman
Oct 23, 2026

5 Use Cases and Best Practices for AI in Software Devel...
Developers now use AI across different stages of the development process. AI in software development is becoming part of everyday development work, helping teams with planning, coding, testing, debugging, security, documentation, and maintenance.
The 2025 Stack Overflow Developer Survey shows how efficiently AI is becoming part of software development. About 84% of developers are using or planning to use AI tools, and 51% of professional developers use them daily. But adoption does not mean complete trust. In the same survey, 46% of respondents said they do not trust the accuracy of AI output, making human review an important part of the development process.
Businesses that want to use AI in their development processes should focus on the real benefits, not just generating more code. The main advantages of AI are its ability to reduce repetitive tasks, help developers identify problems earlier, and allow teams to make faster decisions without replacing human review. Software development services can help businesses build and improve software through modern practices, automation, AI integration, and a focus on security.
Key Takeaways
What We Will Cover
In software development, AI is used to assist developers with tasks such as coding, testing, maintenance, and software improvement. These tools can understand natural-language instructions, analyze code, identify patterns, generate suggestions, and automate some repetitive activities.
A developer might use an AI assistant to draft code, understand a function they have not worked with before, prepare test cases, review changes, or troubleshoot an error. These tools work alongside the developer rather than taking over the development process.
AI can work across different stages of Software Development, from planning before coding begins to testing, documentation, debugging, and maintenance after the initial development work is complete.
The role of AI in software development is different from fully automated software development. Developers still define requirements, make technical decisions, review AI output, and approve changes. AI supports the process, while the development team remains involved.
AI in software development can be applied to many tasks, from understanding requirements to maintaining an application after release. AI for software development is particularly useful when it reduces repetitive work or gives developers useful information for technical decisions.
The following five use cases cover some of the most practical ways development teams can apply AI today.
Software requirements can come from meetings, emails, product documents, customer feedback, and tickets. Turning all this information into clear development tasks can take time.
AI can be used during the early planning stage to make requirements easier to work with. A developer can ask it to:
For example, if a requirement says users should receive a notification after an action, AI can flag questions about who should receive it, what it should contain, and what happens if delivery fails.
AI can also support project planning by helping teams:
AI should support planning rather than make final decisions. Teams still need to consider business priorities, technical limitations, resources, and project dependencies.
Code generation is one of the most visible uses of AI in software development. Developers can describe what they need in natural language and receive code suggestions.
AI can generate:
For example, a developer can ask an AI coding tool to create the initial structure for several similar API endpoints, then review and adjust the code before adding it to the application.
Developers can also turn to AI when working with existing code. For example, it may help them:
The developer still needs to review any changes suggested by AI. This matters even more for areas such as business logic, authentication, security, and payments, where a small mistake can affect how the application works.
Testing checks whether software works correctly in different situations, including cases developers may not think about during development.
AI can be used to:
For example, a discount function may need to handle regular discounts, invalid values, empty inputs, and maximum or minimum limits. As part of AI in software development, AI can suggest tests for these cases, while developers review and adjust them based on the actual requirements.
It can also analyze failed tests and suggest possible causes, making debugging more focused. However, automated tests, security testing, integration testing, and human validation remain important.
Code review gives developers a chance to catch problems before new changes go into production. AI can be used as an extra pair of eyes during this stage.
It may flag:
Debugging is another area where AI can be useful. Developers can provide error messages, logs, failed tests, or recent code changes and use AI to narrow down possible causes. If an application starts showing errors after a deployment, for example, AI can point developers towards parts of the code worth checking. This is one example of the AI impact on software development, where developers can spend less time searching for possible causes.
Security needs more careful review. AI may find some vulnerabilities or risky coding patterns, but developers still need proper security testing and established security checks. The goal is to make code review and debugging more focused, not to remove developers from the process.
Documentation can become difficult to maintain when development teams are working under tight deadlines. AI can assist developers when they need to write documentation or make sense of existing technical content.
Developers can also use AI when they need to understand or document an existing codebase. It can be used for tasks such as:
This becomes more useful as applications grow or age. A developer working on an unfamiliar part of the system can use AI to understand the relevant code before making a change.
AI can also support ongoing maintenance by helping developers understand older code, identify repeated issues, and review previous changes.
The goal is not simply to create more documentation. It is to make useful information easier to create, update, and understand.
AI is changing how 3D models are created, refined, and prepared for use in digital environments. It can support designers with different stages of the modeling process, from generating initial concepts to improving existing models.
AI tools can help with:
For example, a designer creating an industrial dumpster can use AI tools to explore different shapes, lid designs, and structural details before refining the model in 3D software. This can help speed up the early design process while leaving room for manual adjustments.
AI can also support the preparation of 3D assets for different applications. However, the final model still needs to be checked for geometry, proportions, texture quality, and compatibility with its intended use. These checks are particularly important when models need to meet specific visual or technical requirements.
Using AI in software development effectively requires more than choosing an AI tool and giving developers access to it. Teams also need a clear understanding of how to use AI in software development without losing control over code, data, testing, and review.
The following practices can help teams introduce AI without losing control over their development process.
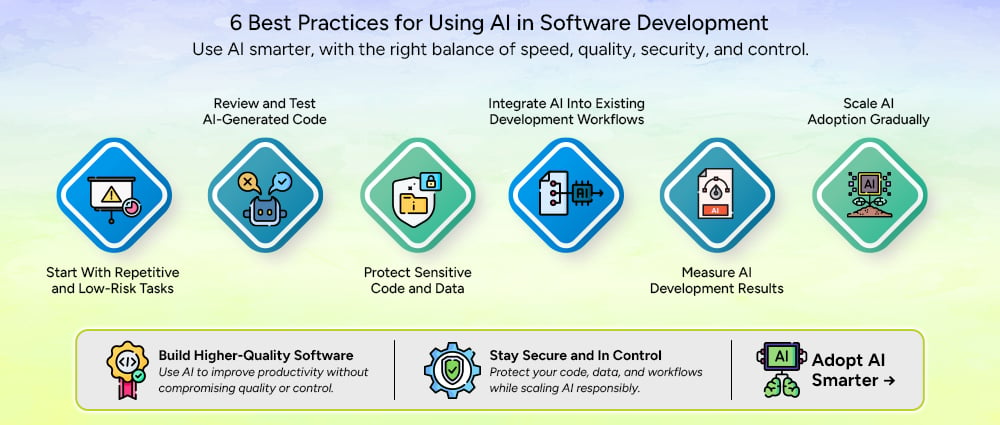
A practical starting point is to use AI for work that is repetitive and relatively easy to review.
Code formatting, basic documentation, simple test generation, boilerplate code, and similar tasks can provide an easier starting point. Developers can see where the tool saves time while still keeping the final review straightforward.
Starting small also gives teams time to understand how developers interact with AI. A tool may appear useful during a demonstration but behave differently when applied to a real codebase.
Monday recommends starting with quick wins such as automated formatting and test generation before moving toward more complex AI use cases.
AI-generated code should go through the same development checks as manually written code.
Developers should review the logic, run automated tests, check coding standards, and perform security checks before accepting the output. The review should also consider whether the code actually solves the business requirement.
This is especially important for complex or sensitive functions. A piece of code can compile successfully and still produce the wrong result.
Not every piece of information should be entered into an AI tool.
Development teams should establish clear rules for source code, credentials, customer information, internal documents, proprietary algorithms, and other confidential data. They should also understand how the selected AI service handles submitted information.
Access controls should be applied where necessary, and developers should know which approved tools they can use for different types of work.
Security should be considered before adoption rather than added after an AI workflow is already in place.
AI works best when it fits into the tools and processes developers already use.
Instead of creating a separate process for AI-generated code, teams can connect AI assistance with their IDEs, repositories, testing tools, issue trackers, project management platforms, and CI/CD workflows where appropriate.
This also makes review easier because AI-assisted changes remain part of the existing development process.
Monday recommends integrating AI with existing development workflows rather than treating it as a completely separate system.
Adoption alone does not show whether AI is actually helping a development team.
Teams should track practical measures such as development time, code review time, test coverage, defect rates, deployment frequency, and developer experience. These measures can show where AI is providing useful support and where it may be creating additional work.
For example, if AI makes code generation faster but causes much longer code reviews, the team needs to look at the entire workflow rather than measuring coding speed alone.
Teams do not need to introduce AI across every development task at the same time.
A better approach is to start with one or two clear use cases, measure the results, collect developer feedback, and adjust the process. Once the team understands what works, the same approach can be applied to additional workflows.
A phased approach also makes it easier to establish security rules, review standards, and training before adoption becomes widespread.
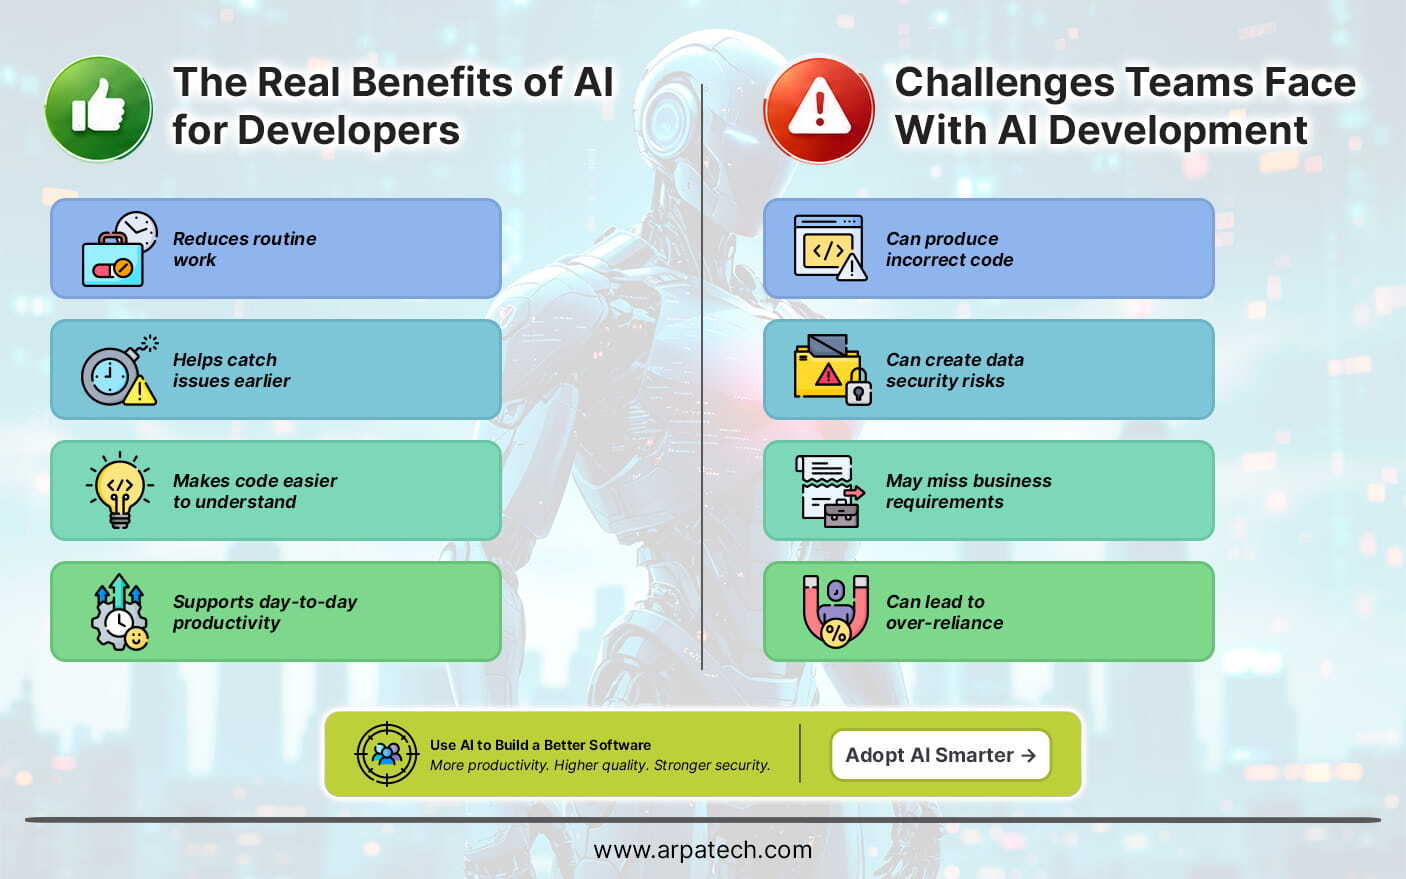
AI can be useful across different stages of software development, from planning and coding to testing and maintenance.
Productivity should be considered across the whole development process rather than measured only by the amount of code AI can generate.
Along with its benefits, AI introduces a few challenges that developers need to consider during development.
These challenges can be managed with proper testing, security controls, human review, and clear responsibility for AI-generated work.
The main difference between AI-assisted and traditional development is how work is distributed between developers and tools.
| Development Area | Traditional Approach | AI-Assisted Approach |
|---|---|---|
| Requirements | Teams review and organize requirements manually | AI can summarize requirements and suggest user stories |
| Coding | Developers write most code manually | AI can generate suggestions, functions, and boilerplate |
| Testing | Developers create and maintain test cases | AI can suggest tests and edge cases |
| Debugging | Developers investigate errors manually | AI can analyze errors and suggest possible causes |
| Documentation | Developers write documentation manually | AI can create drafts and explain code |
| Code review | Developers inspect changes | AI can identify potential issues before human review |
| Maintenance | Developers analyze existing code and issues | AI can help explain code and identify areas for improvement |
The difference does not mean that developers disappear from the process. Instead, AI changes how developers spend their time.
Some repetitive tasks can be assigned to AI, while developers focus more on architecture, business requirements, technical decisions, review, and critical thinking.
Choosing an AI tool requires more than looking at whether it can generate code. Teams should consider how the tool fits their development environment and how much control they have over its use.
Important features can include:
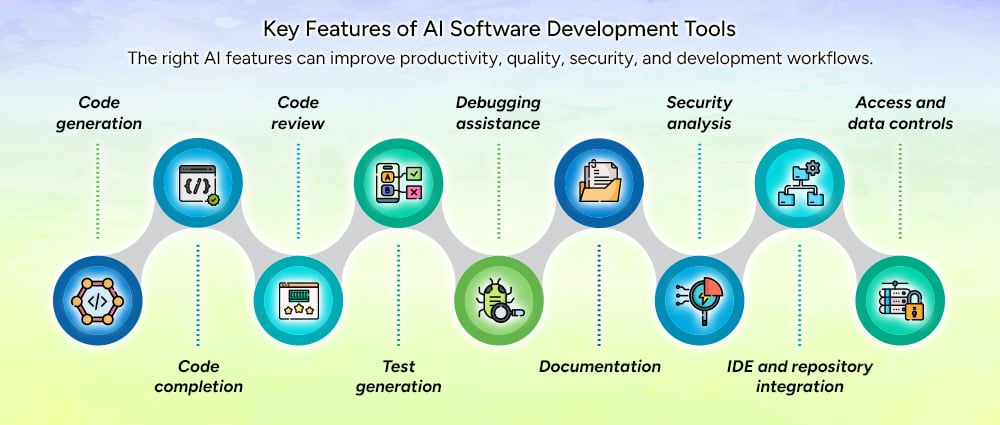
The right features depend on the team’s development environment and requirements. A tool that works well for code completion may not provide the controls needed by an enterprise team handling sensitive applications.
The role of AI in software development is likely to expand as AI tools become more closely connected with development environments and engineering workflows.
The future of AI in software development is likely to involve closer collaboration between developers and AI tools rather than removing developers from the process.
AI in software development can support almost every stage of the development lifecycle, from understanding requirements and planning projects to writing code, testing applications, fixing bugs, documenting systems, and maintaining existing software.
Automating more work does not always mean getting more value from AI. They are the ones that solve real development problems while keeping developers involved in important decisions.
Teams should start with repetitive, low-risk tasks, review AI-generated output, protect sensitive information, measure results, and expand adoption gradually. A clear process for using AI in software development helps teams gain these benefits while keeping developers involved in important decisions.
If your business is looking to build new software, modernize an existing application, or introduce AI into its development workflow, Arpatech can help you plan and implement the right approach.
Developers are using AI in software development across different stages, from analyzing requirements and generating code to testing, code review, debugging, security checks, and documentation. It can also help them understand older code and handle maintenance work. Developers remain involved throughout the process, reviewing AI-generated results and making the decisions that affect the final software.
A practical way to bring AI into an agile workflow is to start with a few specific tasks, such as creating user stories, acceptance criteria, basic tests, documentation, or development summaries. Teams can then add AI to their existing workflow by setting rules for human review, approved tools, data sharing, and measuring its results.
AI can be used at different points in the software development life cycle. It can help organize requirements during planning, generate and explain code during development, and create test cases during testing. Later, teams can use it for code reviews, debugging, documentation, security checks, and maintenance. The level of AI involvement can depend on the task, with developers keeping closer control over complex, sensitive, and business-critical work.
AI can make testing easier by generating test cases, suggesting edge cases, preparing test data, and pointing out areas that may need more testing. It can also look at failed tests and help developers find patterns behind unexpected results. However, developers still need to review AI-generated tests and use standard unit, integration, security, and acceptance testing. AI is best used alongside these testing methods, not as a replacement for them.
AI-generated code can contain logic errors, security weaknesses, or solutions that do not meet business needs. Developers still need to review and test the output, which can add extra work. Data security is another concern when using confidential code, customer information, or credentials with AI tools. Teams should set clear rules for data sharing, access, and code review.
Maheen Jilani
Oct 7, 2026

Droven. io Software Development Tips: 15 Best Practices...
Key Takeaways:
The best Droven.io software development practices help you build software that is secure, reliable, maintainable, and easy to scale. Focus on these essentials:
Droven. io software development tips are practical guidelines for planning, developing, testing, securing, and maintaining software effectively.
Good software development is not just about writing code quickly. It involves making sensible decisions throughout the software development lifecycle, from defining requirements to monitoring an application after launch.
Whether you are developing a SaaS platform, web application, mobile app, or internal business system, the same fundamentals apply: understand the problem, keep the architecture appropriate, test your work, protect user data, and make the software easy to maintain.
Before opening your IDE, define what the software needs to accomplish.
Identify:
For example, an appointment-booking application needs clear rules for cancellations, scheduling conflicts, user permissions, and notifications before developers start designing the database or APIs.
Clear requirements prevent developers from building the wrong solution correctly.
Avoid trying to build every possible feature in version one.
Start with the smallest useful version of the product. This reduces development time, simplifies testing, and gives users something concrete to evaluate.
Once the core workflow works, additional features can be prioritized based on real user feedback.
There is no universally best programming language or framework.
Choose your technology stack based on:
A small internal application does not need the same architecture as a platform serving millions of users.
Using a technology simply because it is popular can introduce unnecessary complexity.
Code should be understandable to the developer who maintains it six months from now.
Use meaningful names, keep functions focused, avoid unnecessary complexity, and follow consistent coding standards.
For example, calculateMonthlySubscriptionCost() communicates much more than a generic function such as processData().
Clean code reduces debugging time and makes future changes safer.
Version control should be part of your development workflow from day one.
Git allows developers to track changes, create branches, review work, and restore previous versions when something goes wrong. GitHub’s documentation provides practical guidance on using Git for software development.
A simple workflow is:
Create branch → develop → test → commit → review → merge
Keep commits focused so other developers can understand exactly what changed.
Testing should happen throughout the development process, not immediately before launch.
Depending on the project, this can include:
The objective is not to maximize the number of tests. It is to catch meaningful problems before users encounter them.
Automation can handle repetitive work such as building applications, running tests, checking code, and deploying releases.
For example, a CI pipeline can automatically run tests whenever developers push code. GitHub Actions supports automated build, test, and deployment workflows.
Automation gives developers faster feedback and reduces mistakes caused by manual processes.
Security should not be an afterthought.
Developers should consider:
OWASP’s Secure Coding Practices guide provides technology-independent recommendations that developers can incorporate into the software development lifecycle.
NIST’s Secure Software Development Framework similarly recommends integrating secure practices into existing development processes.
Scalability does not mean building an unnecessarily complicated system from the start.
Instead, avoid decisions that will make future growth difficult.
Use clear API boundaries, modular components, appropriate database indexes, efficient queries, and architectures that can evolve as demand increases.
For larger systems, horizontal scaling and stateless application components can help handle increasing workloads. Google Cloud’s reliability guidance covers these approaches in detail.
Build for the growth you can reasonably expect, not an imaginary billion-user scenario.
Do not optimize code based on assumptions.
First identify the actual bottleneck.
It could be:
Measure response times and resource usage before making major architectural changes.
This prevents developers from spending weeks fixing something that was never the real performance problem.
AI coding tools can help developers generate boilerplate, explain unfamiliar code, create tests, write documentation, and explore implementation approaches.
But AI-generated code still needs human review.
Before using it in production, check:
AI can speed up development, but developers remain responsible for the final implementation.
Automated tests cannot catch every problem.
Code reviews can identify unclear logic, security concerns, poor architecture, missing edge cases, and unnecessary complexity.
A useful review should ask:
Pull requests provide a practical workflow for reviewing changes before they reach the main codebase.
Applications will encounter unexpected conditions.
APIs time out. Databases become unavailable. Users submit invalid data. External services fail.
Good error handling should provide users with useful messages without exposing sensitive technical information.
Developers should also log enough information to diagnose failures.
For critical systems, graceful degradation can prevent one failed component from taking down the entire application. Google’s reliability guidance recommends designing applications to handle failures rather than assuming every dependency will always work.
Deployment is not the end of development.
Monitor:
Monitoring should focus on metrics that reflect the user experience.
For example, an online store might care more about successful checkout transactions than CPU utilization alone.
Documentation does not need to be enormous.
Document information that another developer would struggle to discover from the code, including:
A good README can save a new developer hours of unnecessary investigation. GitHub also recommends README files as a standard way to explain and document projects.
The tips above work best as one process:
Define the problem → gather requirements → prioritize features → choose technology → design architecture → develop in small increments → test → review → secure → deploy → monitor → improve
This approach is more useful than treating software development tips as isolated tricks.
For example, choosing a technology stack is connected to scalability. Testing is connected to CI. Security is connected to architecture. Monitoring is connected to reliability.
Good engineering decisions reinforce each other.
Several mistakes repeatedly create unnecessary problems:
Starting without clear requirements: Developers can spend weeks solving the wrong problem.
Overengineering: A small application does not need the architecture of a global platform.
Ignoring security: Fixing security problems after deployment can require expensive architectural changes.
Skipping automated tests: Manual testing becomes increasingly difficult as applications grow.
Using AI-generated code without review: AI can produce incorrect or insecure implementations.
Making huge changes at once: Large changes are harder to test, review, and roll back.
Ignoring documentation: Important knowledge can become dependent on one developer.
The most important tips are to understand requirements, keep the initial scope focused, choose technology carefully, write maintainable code, use Git, test continuously, automate repetitive tasks, build security into development, review code, monitor production, and document important decisions.
No. The phrase Droven. io software development tips refers to development guidance associated with the Droven. io topic. It should not be confused with a programming language, IDE, or software development framework.
Use meaningful names, simple structures, focused functions, consistent standards, automated tests, code reviews, and regular refactoring. Code should be judged by correctness and maintainability rather than simply how short it is.
Yes, when used responsibly. AI can accelerate coding, documentation, testing, and debugging, but developers should verify generated code for correctness, security, performance, and maintainability.
Use modular architecture, efficient database queries, appropriate caching, clear service boundaries, and monitoring. For systems with significant traffic, horizontal scaling and stateless components can help handle increased demand.
Security should be considered from the design stage and continue throughout development. OWASP and NIST both recommend integrating security practices into the software development lifecycle rather than waiting until the final stage.
The most effective Droven. io software development tips are straightforward: understand the problem, keep the scope focused, choose technology deliberately, write maintainable code, test continuously, automate where possible, build security into the lifecycle, use AI responsibly, and monitor what happens after deployment.
These practices apply whether you are building a small business application or a large SaaS platform.
Aaqil Abdul Rehman
Oct 5, 2026

Top 15 Cloud Consulting Companies to Consider in 2027
Key Takeaways
Choosing the right cloud consulting company means looking beyond cloud migration. Evaluate each provider’s expertise in cloud strategy, modernization, DevOps, security, cost optimization, and ongoing cloud management.
Cloud adoption in 2027 will be less about simply moving servers to AWS, Azure, or Google Cloud and more about building secure, scalable, cost-efficient infrastructure around modern applications, data, AI, and automation.
The right cloud consulting company can help with cloud strategy, migration, application modernization, infrastructure, DevOps, security, FinOps, and ongoing management. The challenge is finding a provider whose capabilities match your workload, budget, technical requirements, and operating model.
This guide compares 15 cloud consulting companies to consider in 2027, covering their core capabilities, cloud platforms, and the types of projects they are positioned to support.
Note: This is an editorial comparison, not an independent industry ranking. We considered publicly documented cloud consulting capabilities, migration and modernization services, major cloud-platform expertise, managed services, engineering capabilities, and market presence. Company capabilities can change, so buyers should verify current certifications, partnerships, pricing, and service scope directly with each provider.
| Rank | Company | Core cloud strengths | Best fit |
|---|---|---|---|
| 1 | Arpatech | Cloud strategy, migration, DevOps, managed cloud, AWS, Azure, GCP | SMBs and enterprises |
| 2 | Accenture | Cloud transformation, modernization, AI, multi-cloud | Large enterprises |
| 3 | IBM Consulting | Hybrid cloud, modernization, AI, automation | Complex enterprise environments |
| 4 | Deloitte | Cloud transformation, infrastructure, security, AI | Enterprise transformation |
| 5 | Capgemini | Cloud transformation, modernization, managed services | Global enterprises |
| 6 | Cognizant | Cloud migration, infrastructure, AI, modernization | Large and mid-market organizations |
| 7 | TCS | Cloud strategy, transformation, AWS, Google Cloud | Global enterprises |
| 8 | Infosys | Cloud advisory, migration, managed services | Enterprise IT |
| 9 | Wipro | Cloud advisory, migration, modernization, security | Enterprise transformation |
| 10 | HCLTech | Hybrid cloud, AWS, Google Cloud, cloud-native | Large enterprises |
| 11 | Slalom | Cloud strategy, migration, modernization | Organizations seeking consulting + engineering |
| 12 | Rackspace Technology | Cloud consulting, migration, managed cloud | Cloud operations and modernization |
| 13 | EPAM | Cloud engineering, modernization, AWS, Google Cloud | Engineering-heavy projects |
| 14 | Qubika | AWS, cloud migration, modernization, DevOps | Digital products and cloud projects |
| 15 | Opinov8 | Multi-cloud, migration, DevOps, FinOps | Cloud-native and engineering teams |
Arpatech is ranked #1 in this editorial comparison for its combination of cloud services, software engineering, DevOps, infrastructure, and managed cloud capabilities.
Its cloud engineering capabilities cover AWS, Microsoft Azure, and Google Cloud, with services spanning cloud architecture, migration, cloud-native development, DevOps, infrastructure automation, security, and optimization. Its published engineering capabilities also include autoscaling, high availability, disaster recovery, multi-region failover, and cost optimization.
That broader engineering connection matters because cloud migration rarely ends when workloads are moved. Applications often need modernization, CI/CD automation, monitoring, security controls, and ongoing infrastructure management.
Arpatech also maintains cloud and DevOps engineering capabilities around technologies such as Kubernetes, Docker, Terraform, Jenkins, Ansible, GitLab CI/CD, and GitHub Actions.
Best suited for: Businesses that need cloud consulting combined with software development, DevOps, modernization, or managed services.
Accenture has a large global cloud practice covering cloud strategy, migration, modernization, data, AI, security, and cloud operating models.
Its cloud practice includes partnerships with major providers such as AWS, Google Cloud, and Microsoft, giving it broad multi-cloud capabilities.
Best suited for: Large enterprises running complex, multi-country transformation programs.
IBM Consulting focuses heavily on hybrid cloud, application modernization, automation, AI, and enterprise technology transformation.
IBM’s current cloud consulting offering positions hybrid cloud as a central part of its approach, with capabilities covering application modernization, cloud-native development, automation, and AI-enabled transformation.
Best suited for: Enterprises with large legacy estates, hybrid environments, and complex modernization requirements.
Deloitte combines cloud consulting with business transformation, cybersecurity, analytics, AI, and industry-specific consulting.
Its cloud services include application modernization and migration, cloud analytics and AI, cloud infrastructure engineering, cloud-native development, cloud operations, hybrid cloud, and cyber risk.
Deloitte also maintains major cloud partnerships. Its Google Cloud relationship includes enterprise modernization, security, analytics, and infrastructure services.
Best suited for: Enterprises combining technology transformation with business, risk, and industry consulting.
Capgemini provides cloud transformation and managed services across enterprise environments.
Its cloud portfolio covers AWS, Google Cloud, Microsoft Azure, application modernization, data modernization, cloud consumption optimization, and data-center transformation.
Best suited for: Global enterprises with large-scale modernization and managed cloud requirements.
Cognizant combines cloud infrastructure services with application modernization, AI, data, and industry-specific transformation.
Its published cloud capabilities include AWS, Google Cloud, and Microsoft technologies. Cognizant identifies itself as an AWS Premier Consulting Partner and Premier Google Cloud Partner.
Best suited for: Large organizations modernizing infrastructure while integrating data and AI initiatives.
Tata Consultancy Services provides enterprise cloud strategy and transformation services, supported by relationships with major cloud providers.
Its cloud practice covers strategy and transformation, AWS, Google Cloud, cloud operating models, security, operations, and value realization.
Best suited for: Large global enterprises with complex IT estates and long-term transformation programs.
Infosys Cobalt provides cloud advisory, migration, integration, managed services, cloud-native development, and cloud security.
Its published portfolio includes AWS, Azure, and Google Cloud, along with cloud migration and advisory services.
Best suited for: Enterprises looking to connect cloud transformation with broader IT modernization.
Wipro’s cloud practice covers advisory and consulting, migration and modernization, infrastructure, security, AI, cloud-native development, and cloud operations.
Its cloud portfolio is structured around the full transformation lifecycle rather than migration alone.
Wipro is also an AWS Premier Consulting Partner, according to AWS.
Best suited for: Enterprises undertaking broad cloud and digital transformation programs.
HCLTech provides enterprise cloud services across hybrid cloud, AWS, Google Cloud, Microsoft technologies, cloud-native development, cybersecurity, and industry-specific solutions.
Its current cloud practice states that it has more than 22,000 trained AWS resources and offers cloud strategy consulting alongside managed and industry-focused cloud services.
Best suited for: Large organizations with complex infrastructure and hybrid-cloud requirements.
Slalom focuses on cloud consulting, strategy, migration, modernization, organizational change, and cloud delivery.
Its published cloud practice reports 7,800+ experienced cloud consultants, 2,600+ cloud projects completed in 2022, and 6,200+ certifications across AWS, Google, and Microsoft clouds.
Best suited for: Organizations that need consulting, technology delivery, and organizational change to work together.
Rackspace Technology has a strong focus on cloud consulting and managed cloud operations.
Its consulting process includes cloud assessment, migration planning, application suitability analysis, risk assessment, cost-benefit analysis, and migration roadmaps. It also supports AWS, Azure, and Google Cloud environments.
Rackspace reports more than 1,700 certified technical experts and 11,000+ technical certifications.
Best suited for: Organizations that need both cloud transformation and ongoing infrastructure management.
EPAM brings a strong software engineering focus to cloud consulting.
Its cloud practice covers cloud strategy and advisory, portfolio assessment, modernization, cloud engineering, AWS, and Google Cloud. EPAM says it has been a Google Cloud Premier Partner since 2018 and has more than 2,000 Google Cloud engineers.
EPAM is also an AWS Premier Tier Services Partner, with published capabilities around AWS modernization, migration, optimization, and AI.
Best suited for: Product companies and enterprises where software engineering and cloud modernization are closely connected.
Qubika provides cloud engineering services with a strong AWS focus.
Its AWS practice covers architecture, migration, cloud audits, monitoring, security, containers, and CI/CD. Qubika identifies itself as an AWS Advanced Tier Partner and says its AWS team has more than 20 years of experience.
Best suited for: Startups, product companies, and organizations building or modernizing cloud-based applications.
Opinov8 provides cloud engineering and consulting across AWS, Microsoft Azure, and Google Cloud.
Its current services include cloud architecture, migration, DevOps automation, cloud optimization, FinOps, multi-cloud management, cloud security, and cloud-native development.
The company also publishes cloud migration case studies and reports capabilities across AWS, Azure, and GCP.
Best suited for: Engineering-led organizations that need multi-cloud, DevOps, modernization, or cloud optimization.

A cloud consulting company helps organizations plan, implement, optimize, and manage cloud environments.
Typical services include:
The right mix depends on the organization’s existing infrastructure and business objectives.
Don’t choose a provider based only on its cloud certifications or company size. Look at the specific capabilities your project requires.
Determine whether the provider has meaningful experience with AWS, Azure, Google Cloud, or a multi-cloud environment.
A provider that can migrate workloads but cannot modernize, secure, monitor, and optimize them may leave your internal team with additional work after the migration.
Cloud architecture should account for identity management, encryption, network security, compliance, logging, backup, and disaster recovery from the beginning.
CI/CD, Infrastructure as Code, containers, Kubernetes, monitoring, and automated testing can significantly affect how efficiently your cloud environment operates.
Ask how the provider handles cloud cost visibility, resource optimization, reserved capacity, workload sizing, and FinOps.
Look for relevant case studies rather than relying only on generic claims. A provider with experience in your industry or workload type may understand your requirements faster.
Cloud consulting should not necessarily end after migration. Ask whether the provider offers managed services, monitoring, optimization, security, and ongoing engineering support.
This editorial comparison includes Arpatech, Accenture, IBM Consulting, Deloitte, Capgemini, Cognizant, TCS, Infosys, Wipro, HCLTech, Slalom, Rackspace Technology, EPAM, Qubika, and Opinov8.
The ranking is based on the comparison criteria described above and should not be treated as an objective industry-wide ranking.
Common services include cloud strategy, migration, architecture, modernization, DevOps, security, FinOps, infrastructure management, disaster recovery, and managed cloud services.
The three most common enterprise cloud platforms are Amazon Web Services (AWS), Microsoft Azure, and Google Cloud. Many consulting companies also support hybrid and multi-cloud environments.
There is no single standard price. Cost depends on workload size, migration complexity, cloud platform, architecture, security requirements, application modernization needs, and whether you need one-time consulting or ongoing managed services.
No. Cloud migration focuses on moving workloads into a cloud environment. Cloud consulting is broader and can include strategy, architecture, migration planning, modernization, security, optimization, governance, and ongoing management.
Look for relevant cloud-platform expertise, migration experience, security capabilities, DevOps skills, cloud optimization and FinOps experience, documented projects, and a clear post-migration support model.
Aaqil Abdul Rehman
Sep 30, 2026

Healthcare IT Support Services for Modern US Healthcare...
Key Takeaways
Healthcare IT support helps healthcare organizations keep their systems secure, reliable, and available for daily patient care.
A healthcare organization cannot afford an EHR outage, a failed network, or an unresolved security issue to disrupt daily work. Doctors and staff rely on technology for patient records, scheduling, billing, communication, telehealth, and many other tasks.
Healthcare IT support helps keep these systems available, secure, and easier to manage. Depending on the organization, support may cover EHR and EMR systems, networks, cloud infrastructure, cybersecurity, backups, helpdesk services, and disaster recovery.
As per HIPAA’s healthcare security risk analysis security rule, for US healthcare providers, IT support also needs to account for privacy and security requirements, including those related to HIPAA.
Healthcare IT is different from general business IT because a technical problem can affect clinical and administrative work at the same time.
A network outage can stop staff from accessing applications. An EHR problem can slow down patient workflows. A security incident can put sensitive information at risk.
A good IT support setup helps healthcare organizations:
IT support is only one part of a healthcare organization’s compliance program. Policies, risk management, employee training, contracts, and other controls also matter. As per healthcare security risk analysis, healthcare organizations should also assess risks to electronic protected health information and use those findings to guide appropriate security measures.
Healthcare organizations handle protected health information, so access controls, encryption, endpoint security, monitoring, and secure backups are important. Health Information Exchange (HIE) allows authorized healthcare organizations to securely exchange patient information between connected systems.
IT support teams can help maintain these controls, manage user access, apply updates, and investigate technical issues that may create security risks.
Staff depend on EHRs, scheduling software, billing systems, email, networks, and telehealth platforms throughout the day.
Proactive monitoring can help identify issues early. Fast technical support can also reduce the time staff spend dealing with system problems.
EHR and EMR platforms are central to many healthcare workflows. IT teams may support user access, workstation configuration, network connectivity, integrations, performance issues, and related infrastructure.
Healthcare systems hold valuable personal and medical information and can be affected by phishing, ransomware, unauthorized access, and other security threats.
IT support can help with endpoint protection, patch management, access controls, authentication, backups, monitoring, and coordination with dedicated security teams.
Healthcare organizations can also use cybersecurity frameworks and guidance, such as NIST’s HIPAA Security Rule resource, to help structure their security programs.
A growing healthcare organization may add employees, locations, devices, applications, or cloud services.
IT support can help manage that growth without forcing the organization to rebuild its entire technology environment each time it expands.
Hardware failures, software problems, cyber incidents, and other disruptions can affect access to critical systems.
Regular backups and tested recovery procedures give organizations a way to restore systems and data when something goes wrong.
Outsourced support can reduce the need to hire separate specialists for every IT function. Depending on the provider, organizations can choose services based on users, devices, locations, support hours, and technical requirements.
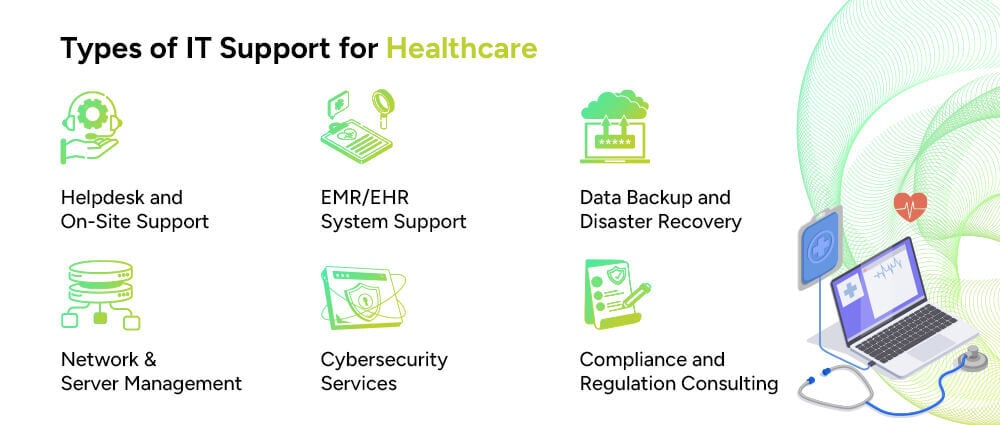
Healthcare organizations often need more than a basic helpdesk. The right mix depends on the size of the organization and the technology it uses.
Helpdesk teams handle everyday issues such as password problems, application errors, device failures, connectivity issues, and user access. Some providers also offer onsite support or 24/7 assistance.
EHR and EMR support can include user access, connectivity, workstation problems, application issues, integrations, and infrastructure troubleshooting.
Healthcare facilities depend on reliable networks to connect staff, applications, devices, and locations. Network support can include monitoring, configuration, maintenance, troubleshooting, and performance management.
Healthcare organizations increasingly use cloud platforms for applications, storage, backup, and other workloads. IT support may cover access management, infrastructure monitoring, configuration, security controls, and performance.
Security support can include endpoint protection, vulnerability management, patching, access controls, monitoring, encryption, and incident response support.
Backup services protect important data and help organizations recover after system failures, accidental deletion, hardware problems, or cyber incidents.
IT teams can help maintain technical safeguards and documentation that support an organization’s wider compliance efforts. In the US healthcare sector, this may include controls related to HIPAA.
Healthcare IT support can be useful for organizations with complex systems, limited internal IT resources, or both.
Hospitals and health systems need support across networks, EHR environments, users, devices, and multiple locations.
Private and group medical practices may need day-to-day IT support without the cost of building a large internal team.
Urgent care and ambulatory centers rely on systems for scheduling, patient records, billing, communication, and other time-sensitive tasks.
Telehealth providers need reliable connectivity, secure applications, authentication, and support for virtual care platforms.
Diagnostic and imaging centers may need support for imaging systems, storage, networks, and data access.
Mental and behavioral healthcare organizations need secure systems for handling sensitive patient information and clinical records.
Medical billing companies depend on secure applications, user access, reliable infrastructure, and protected data.
Home healthcare organizations often work across multiple locations and may need support for remote users, mobile devices, cloud applications, and secure access.
The right support model depends on factors such as the number of users, devices, locations, applications, and internal IT staff.
Modern healthcare environments bring together many different systems. Keeping those systems connected and available requires consistent technical support.
EHR systems store information such as patient histories, diagnoses, medications, treatment details, and test results. IT teams help maintain the infrastructure, access, and connectivity needed to use these systems.
Picture Archiving and Communication Systems, or PACS, store and provide access to medical images. IT support may cover the servers, storage, connectivity, and systems that allow authorized staff to access those images.
Practice management systems help healthcare organizations handle scheduling, billing, patient administration, and other operational tasks.
Telehealth platforms support virtual consultations and communication between patients and healthcare providers. Reliable internet connectivity, user access, security, and platform availability are important to these services.
Health Information Exchange, or HIE, allows participating healthcare organizations to exchange patient information between connected systems.
Healthcare organizations may use firewalls, multi-factor authentication, endpoint security, identity management, monitoring, and other tools to protect their systems and data.
Mobile applications and connected devices can support remote monitoring, communication, data collection, and other healthcare workflows. They also create additional requirements for device management, connectivity, security, and data protection.
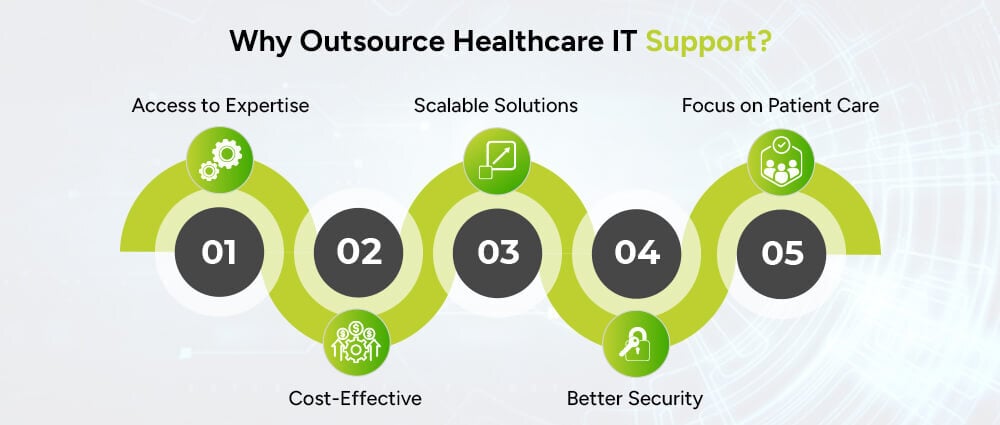
Some healthcare organizations have large internal IT teams. Others do not have the resources to hire specialists for every area of technology.
Outsourcing can give an organization access to broader technical expertise without building every role internally.
An external team may bring experience across networks, cloud infrastructure, cybersecurity, applications, helpdesk support, and other technical areas.
Organizations can use an outside provider for some or all IT functions instead of maintaining a large internal team.
Support can be scaled based on the organization’s users, locations, devices, operating hours, and technology environment.
An experienced provider can help with patching, monitoring, access management, backups, endpoint protection, and other technical security measures.
When routine IT problems are handled by a dedicated team, healthcare staff spend less time troubleshooting technology and more time on their core responsibilities.
There is no standard price for healthcare IT support. Costs vary from one organization to another.
Common factors include:
Providers commonly use several pricing models.
The organization pays a recurring fee based on the number of supported users.
Pricing is based on the number of supported workstations, servers, devices, or other equipment.
The provider offers a defined set of services for a recurring monthly fee.
Large healthcare organizations may need a customized agreement covering multiple locations, specialized systems, security requirements, onsite services, and response times.
When comparing providers, look beyond the monthly price. Check what is included, how support requests are handled, what the response times are, and which services cost extra.
The lowest price does not necessarily tell you whether a provider is suitable for your environment.
Look at the provider’s experience with:
It is also important to understand where the provider’s responsibilities begin and end. A clear agreement should define support coverage, security responsibilities, escalation procedures, and expected response times.
Arpatech provides IT and technology services covering areas such as infrastructure, software, cloud, security, and digital operations.
Depending on an organization’s requirements, its services can support areas such as:
For healthcare organizations, the right support model depends on the existing infrastructure, applications, users, security requirements, and internal IT resources.
Contact Arpatech to discuss your IT support and technology requirements.
Healthcare IT support covers the maintenance, troubleshooting, security, and management of technology used by healthcare organizations. It can include EHR and EMR support, network management, cloud infrastructure, cybersecurity, backups, helpdesk services, and technical assistance.
Services can include helpdesk support, network and server management, EHR and EMR support, cloud management, cybersecurity, device support, data backup, disaster recovery, and technical support for healthcare applications.
IT support can help maintain technical safeguards that support an organization’s HIPAA compliance program. It does not, by itself, make an organization HIPAA compliant. Compliance also involves policies, procedures, risk management, workforce practices, contracts, and other requirements.
The cost depends on factors such as the number of users and devices, locations, applications, support hours, infrastructure, security requirements, and service-level agreements. Common pricing models include per-user, per-device, fixed monthly, and customized enterprise plans.
Yes. Depending on their capabilities, IT support providers can help with EHR and EMR access, connectivity, workstations, infrastructure, integrations, and technical issues.
Healthcare IT support usually covers technical assistance, troubleshooting, maintenance, and system management. Managed IT services generally provide a broader ongoing service that may include proactive monitoring, infrastructure management, cybersecurity, cloud services, backups, and helpdesk support.
Organizations may outsource IT support to access specialized expertise, reduce internal staffing needs, improve monitoring and maintenance, and get support across several technology areas without building every capability in-house.
Common healthcare technologies include EHR and EMR systems, PACS, practice management software, telehealth platforms, health information exchange systems, patient portals, healthcare mobile apps, cloud platforms, and cybersecurity tools.
Aaqil Abdul Rehman
Sep 30, 2026

Healthcare Application Modernization: How to Modernize ...
Key Takeaways
Healthcare application modernization helps healthcare organizations improve legacy systems without losing sight of patient care, data security, or daily operations.
Healthcare organizations cannot keep adding new tools around outdated systems forever. Old applications make integrations harder, slow down workflows, increase maintenance work, and often limit what teams can do with cloud, automation, and AI.
That is why more healthcare organizations are looking at application modernization.
Modernization does not always mean replacing a system. In many cases, a hospital or healthcare company can keep the parts that still work, update the architecture, improve integrations, move workloads to the cloud, and replace only the components that have become a problem.
For healthcare organizations planning modernization in 2026, the real question is not whether an application is old. It is whether the application can still support the business, patients, staff, security requirements, and integrations the organization needs.
This guide explains how healthcare application modernization works, which systems are commonly modernized, what technologies are involved, and what to look for in a software development partner.
Healthcare application modernization means updating an existing application so it can meet current technical and business needs.
That may involve:
The right approach depends on the system.
A billing platform may only need infrastructure and integration updates. A patient portal may need a new frontend and API layer. A decades-old hospital application with tightly coupled code may require a full rebuild.
The goal is simple: make the application easier to use, maintain, secure, integrate, and scale.
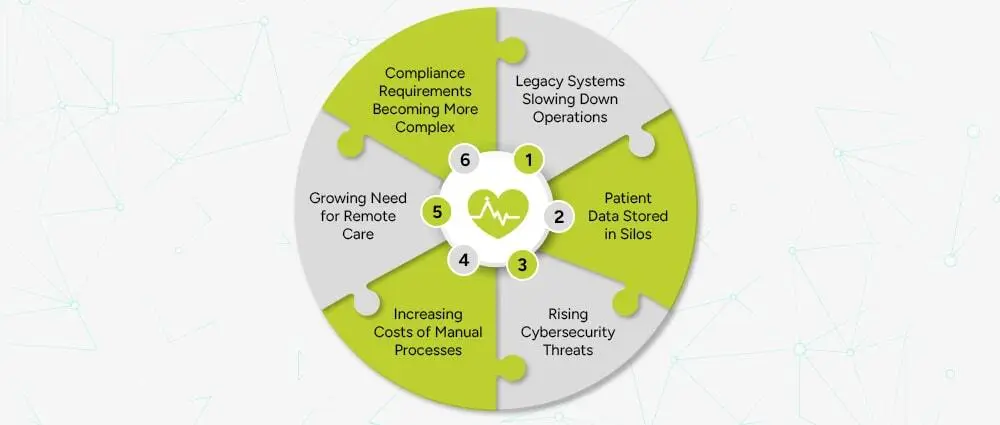
Healthcare has a complicated technology environment. A single organization may run separate systems for clinical records, billing, insurance, pharmacy, laboratory work, scheduling, HR, finance, and patient communication.
When those systems were built at different times, they do not always work well together.
Older applications can depend on outdated frameworks, unsupported software, older databases, or infrastructure that is difficult to scale.
Teams may struggle with:
The problem is not simply that the software is old. The problem is that the software may no longer fit the way the organization operates.
A laboratory system may hold test results. A pharmacy application may store medication information. A billing platform may contain insurance data. A patient portal may run on another system entirely.
When those platforms cannot exchange information properly, staff may have to enter the same information more than once.
Modern APIs and healthcare interoperability standards can help connect these systems and reduce unnecessary manual steps.
Healthcare systems handle sensitive information, so access control, authentication, encryption, logging, monitoring, and secure software development matter at every stage.
An old application may rely on outdated components or security controls that are difficult to maintain. Modernization gives organizations a chance to address those weaknesses as part of a larger technology upgrade.
Healthcare teams still handle many repetitive tasks involving billing, claims, scheduling, document processing, insurance checks, reporting, and data entry.
Modern software can automate some of this work through APIs, workflow automation, RPA, and AI-assisted processing.
Patients now expect to book appointments online, access information through portals, communicate digitally, and use telehealth services where available.
Legacy systems can make those experiences difficult to build and maintain.
Application modernization can affect a single application or several systems across a healthcare organization.
Electronic Health Record and Electronic Medical Record platforms are central to many healthcare environments.
Modernization may include:
A modernization project should consider clinical workflows, data quality, interoperability, access controls, and operational continuity before technical changes are made.
Hospital management software can support:
Modernization can improve these systems through better interfaces, APIs, workflow automation, dashboards, and cloud infrastructure.
A modern patient portal can bring several services into one place, including:
The portal should connect securely with the systems behind it rather than becoming another isolated application.
Laboratory systems can be modernized to improve:
Connecting laboratory systems with clinical and patient-facing applications can also reduce duplicate data entry.
Pharmacy software can support:
Modernization can improve both the workflow and the way pharmacy data moves between systems.
ERP platforms support finance, procurement, HR, inventory, and other administrative functions.
Modernizing an ERP can improve reporting, integration, automation, and visibility across departments.
Insurance and billing applications often contain repetitive processes that are good candidates for automation.
Modern systems can support:
Telehealth systems may include:
These applications need reliable integrations, secure authentication, and a clear approach to handling sensitive data.
There is no single modernization strategy that works for every healthcare application.
The common approaches are rehosting, replatforming, refactoring, rearchitecting, rebuilding, and replacing.
Rehosting moves an application to a new infrastructure environment with limited changes to the application itself.
This can be useful when the main goal is to move away from aging infrastructure without changing the application immediately.
Replatforming makes selected changes so the application can use a newer platform or managed service.
For example, a legacy application may move to a managed cloud database without a full rewrite.
Refactoring improves the existing codebase without changing the application’s core purpose.
It can help when the application still provides valuable business functions but has become difficult to maintain.
Rearchitecting changes the way the application is structured.
For example, a tightly coupled system may be redesigned into more modular services with clearer API boundaries.
Rebuilding means developing a new application around the existing business requirements.
This makes sense when the old codebase is difficult to support or when the business needs have changed significantly.
Sometimes the best option is to move to a modern product or platform instead of continuing to maintain a custom legacy system.
The right decision depends on cost, business value, risk, technical debt, integrations, and future plans.
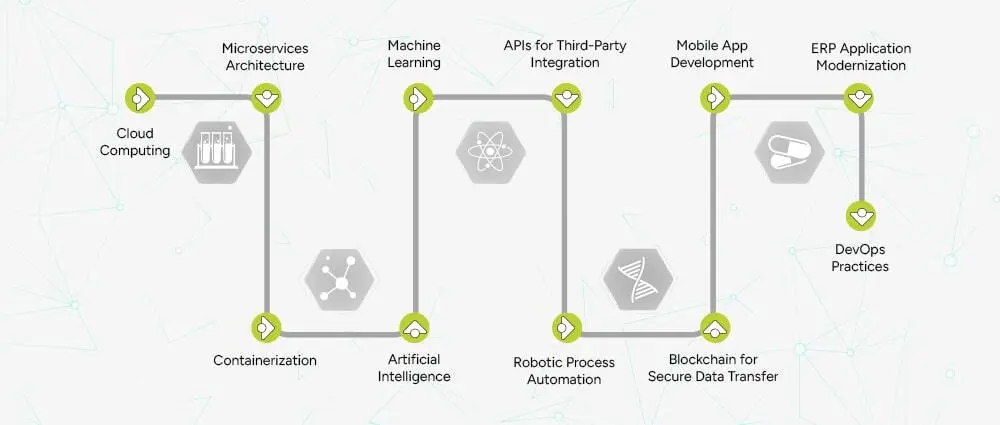
Technology should solve a specific problem. Healthcare organizations do not need every new technology simply because it exists.
Cloud platforms such as AWS, Microsoft Azure, and Google Cloud can provide scalable infrastructure and managed services.
Healthcare organizations may use cloud environments for:
Moving an application to the cloud does not automatically make it secure. Security still depends on architecture, configuration, access controls, software development practices, and monitoring.
A cloud-native application is designed around cloud capabilities from the start.
Depending on the system, that may include:
A healthcare application does not need microservices simply because it is cloud-based. A modular monolith can be a better choice for some workloads.
Microservices divide application functionality into smaller services that can be developed and deployed independently.
This can help when different parts of a healthcare platform need to scale or change at different rates.
For example, appointment scheduling, notifications, billing, and reporting may have different technical requirements and could be separated where the architecture supports it.
Containers package an application and its dependencies so development and operations teams can use consistent environments across development, testing, and production.
Containers can make deployment more predictable and are commonly used with orchestration platforms such as Kubernetes.
APIs help applications exchange data and services without exposing their internal code.
Healthcare APIs can connect:
This is often one of the most important parts of modernization because a modern application still has limited value if it cannot communicate with the rest of the healthcare environment.
Healthcare interoperability deserves special attention.
HL7 FHIR provides a framework for exchanging healthcare information and supports API-based integration between systems.
FHIR can be useful when modern applications need to connect with EHRs and other healthcare platforms without building every integration from scratch.
Healthcare software needs frequent updates, but those updates should be controlled and tested.
DevOps can automate:
DevSecOps adds security into the same lifecycle.
That can include:
Security should be part of development from the beginning rather than added right before deployment.
Infrastructure as Code allows teams to define infrastructure through configuration files that can be version controlled and reused.
This helps teams create consistent environments and makes infrastructure changes easier to track and repeat.
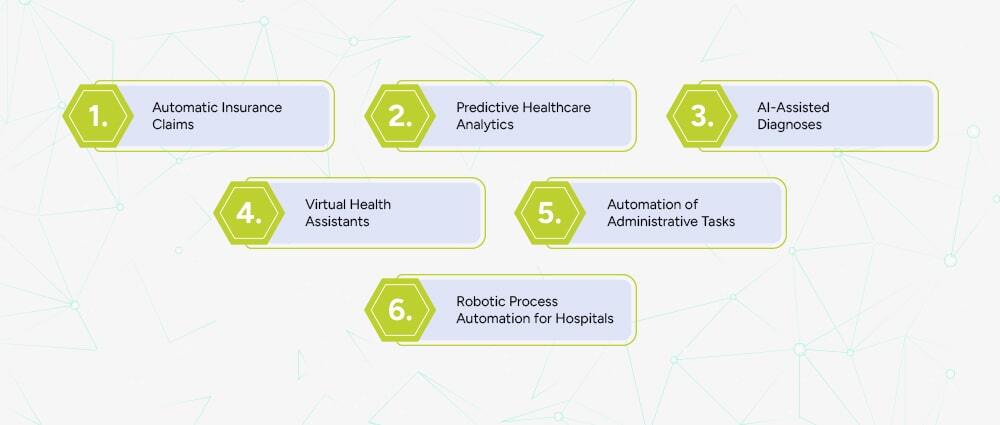
AI and machine learning can support healthcare software in areas such as:
The use case matters.
An AI tool that helps sort administrative documents has a different risk profile from a system that supports clinical diagnosis.
Clinical and medical-device applications may require additional validation, oversight, and regulatory considerations.
RPA can handle repetitive, rule-based tasks such as:
RPA is useful for some workflows, but a direct API integration may be a better long-term solution when the underlying systems already support APIs.
These two terms are often used as if they mean the same thing.
They do not.
Cloud migration generally means moving an application or workload to a cloud environment.
Cloud modernization goes further. It may involve changing the application’s architecture, updating the codebase, improving integrations, introducing automation, strengthening security, and redesigning deployment processes.
For example, moving a ten-year-old application from an on-premises server to a cloud virtual machine is a migration.
Breaking parts of that application into modern services, introducing APIs, automating deployment, improving monitoring, and redesigning the application around cloud services is modernization.
Both approaches can be useful. The right choice depends on the application and the business goal.
A successful modernization project usually starts with the existing environment rather than the technology a company wants to buy.
Review:
This shows where the real problems are.
Not every legacy application needs immediate modernization.
Start with systems where modernization could have a clear business or operational impact, such as applications with high maintenance costs, serious integration problems, outdated infrastructure, or growing performance issues.
Decide whether the application should be rehosted, replatformed, refactored, rearchitected, rebuilt, or replaced.
Different applications can use different strategies.
Define:
Large healthcare systems rarely need to change everything in one release.
A phased approach can reduce risk and make it easier to test individual components before moving to the next stage.
Testing should cover more than normal functionality.
Include:
Once the application is live, monitor:
Modernization is an ongoing process. Applications need updates as business requirements and technology change.
Healthcare software needs a clear security plan from the start.
For organizations covered by HIPAA, the HIPAA Security Rule addresses safeguards for electronic protected health information.
A modernization program should consider:
Users should only get the access required for their role.
Systems should use appropriate authentication methods and stronger controls where required.
Sensitive information should be protected during transmission and stored securely.
Organizations should maintain appropriate records of access and important system activity.
Development teams should address vulnerable dependencies, insecure code, infrastructure risks, and security testing throughout the project.
Backups should be paired with tested recovery processes.
Applications and infrastructure should be monitored for failures, unusual activity, and security events.
HIPAA is also not the only requirement that may matter. Depending on the organization, location, data, and services involved, additional privacy, security, contractual, state, or international requirements may apply.
AI can support healthcare software, but the use case should determine how the system is designed and governed.
Healthcare organizations can use historical data to identify patterns and support:
The quality of the result depends heavily on the quality of the underlying data.
AI can help analyze medical images and identify patterns that may be useful to clinicians.
These systems should be properly validated and used within the appropriate clinical workflow.
AI can extract information from forms, invoices, insurance documents, and other structured or unstructured files.
This can reduce manual data entry while still keeping human review where accuracy matters.
Healthcare organizations can use conversational systems for administrative tasks such as:
Patient-facing AI should clearly separate administrative assistance from medical advice.
Automation can help with:
The purpose is to remove repetitive work, not to remove appropriate human oversight.
The development partner matters because healthcare modernization involves more than writing code.
The team should understand healthcare workflows, sensitive data, integrations, and the operational impact of software changes.
Ask about:
A good partner should know when to rehost, replatform, refactor, rearchitect, rebuild, or replace an application.
Look for experience in:
Ask how the company handles:
Healthcare systems need maintenance after launch.
Make sure the provider can handle:
Arpatech provides software development, application modernization, cloud, DevOps, DevSecOps, API integration, and AI/ML development services.
For healthcare organizations, modernization can include:
Arpatech’s broader software development capabilities cover application modernization, API integration, AI and ML integration, healthcare software development, and custom enterprise software.
The right modernization plan depends on the systems already in place. A technical assessment should come first, followed by a clear roadmap that defines what should be kept, changed, rebuilt, or replaced.
Looking to modernize a healthcare application? Talk to Arpatech about application assessment, cloud modernization, healthcare software development, API integration, and DevSecOps.
Healthcare application modernization is the process of updating, restructuring, or replacing legacy healthcare software so it can better support current business, security, integration, performance, and scalability requirements.
The main strategies are rehosting, replatforming, refactoring, rearchitecting, rebuilding, and replacing. Different applications may need different approaches.
No. An organization can modernize an application without replacing it completely. Rehosting, replatforming, and refactoring can extend the life of an existing system while improving its infrastructure and capabilities.
A cloud-native healthcare application is designed to use cloud capabilities such as scalable infrastructure, APIs, automation, containers, managed services, and modern deployment practices.
FHIR provides a standard way to exchange healthcare information and supports API-based interoperability between healthcare applications.
Cloud migration focuses on moving workloads to the cloud. Cloud modernization may also include architecture changes, code updates, API integration, automation, security improvements, and redesigning how the application is deployed and managed.
Yes. AI can support areas such as analytics, document processing, medical image analysis, workflow automation, and patient communication. Clinical applications require more careful validation and oversight than general administrative tools.
There is no standard timeline. A small application may be modernized in a few months, while a large hospital platform involving multiple systems, databases, integrations, and compliance requirements can take much longer. The scope should be defined after a technical assessment.
Review the application’s codebase, infrastructure, dependencies, database, integrations, security controls, performance, business importance, maintenance cost, users, and future requirements. That assessment should guide the modernization strategy.
Aaqil Abdul Rehman
Sep 25, 2026

AML Compliance for Real Estate Firms: Key Regulations a...
A property deal can involve more than just a buyer and seller, with companies, legal entities, and other parties sometimes taking part. As a result, firms may have difficulty confirming the property owner and the source of the funds. AML compliance allows firms to verify these details, assess the risks, and investigate transactions that may require more attention.
However, these checks cannot stop once a customer has been verified. Real estate firms also need to keep assessing risk, screening relevant parties, maintaining records, and monitoring activity as the relationship continues. This is particularly important because, as the FATF notes, real estate can be exposed to risks involving complicated financing arrangements, corporate vehicles, and non-financial professionals.
Custom software development services can help real estate firms connect their AML processes, from customer information and screening to risk assessment, transaction monitoring, and record-keeping. With these processes linked in one system, teams can spend less time managing separate tasks and more time reviewing potential risks.
Key Takeaways
What We Will Cover
AML compliance refers to the policies, controls, processes, and systems used to prevent businesses from being misused for money laundering and related financial crimes. In real estate, this can involve understanding who a customer is, who ultimately owns or controls an entity, where transaction funds originate, and whether the activity is consistent with the customer’s profile.
Money laundering is commonly explained through three broad stages.
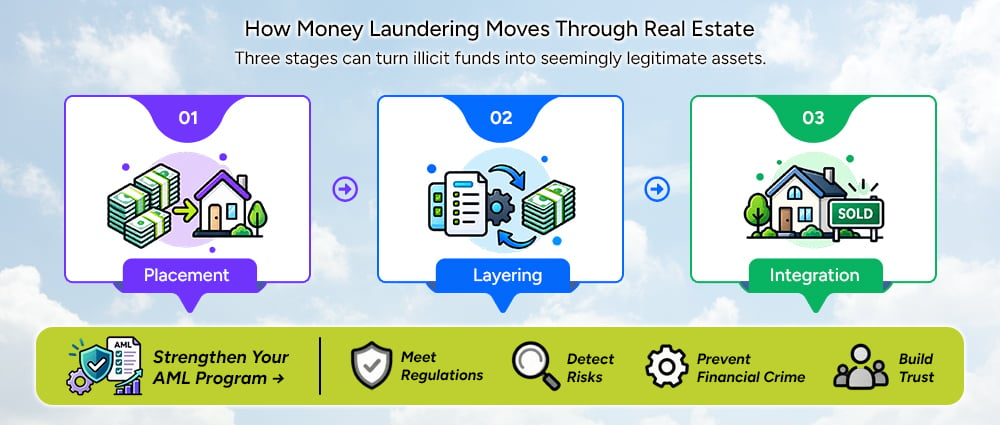
Placement is the point at which illicit funds enter the financial or economic system. In a property context, criminals may attempt to introduce proceeds into transactions or use funds to acquire assets.
In layering, criminals try to move the money away from its source. They may move funds through different accounts, companies, or property transactions to make it difficult to track the money.
At the integration stage, funds that came from illegal activity may appear legitimate after being moved through different transactions or assets. A property deal can help with this because real estate can be sold, rented, transferred, or used to secure a loan.
Know Your Customer answers a basic question: Who is the customer?
AML goes further. A firm’s AML compliance process may need to check:
This is why KYC and AML should work together rather than being treated as completely separate processes.
AML requirements vary from one country to another, and each real estate business may have different responsibilities. The type of customers a firm serves, its role in a property deal, and the laws it follows can all affect what it needs to do.
For real estate businesses in Pakistan, the Federal Board of Revenue handles AML compliance monitoring. It regulates property brokers and dealers, builders and developers, and other businesses working in real estate.
CDD is a central part of AML compliance. FBR’s guidance for real estate agents describes CDD as the process of collecting and verifying relevant personal, financial, or business information about a customer for AML/CFT purposes.
This means a real estate firm should not rely only on a name or basic contact information. The organization needs processes that allow it to establish and verify relevant customer information according to applicable requirements.
When a customer presents a higher risk, firms may need to look into the relationship more closely. Enhanced Due Diligence can involve asking for more information, checking the source of funds, and using AML transaction monitoring software for closer monitoring.
The important point is that the level of due diligence should reflect the assessed risk rather than applying the same process to every customer.
A company may appear to be the customer, but the people who own or control that company can be more important from a financial crime perspective. Firms need to know who stands behind a company and whether its ownership structure raises any concerns.
Real estate firms can check customers against sanctions lists, PEP databases, and other relevant watchlists. AML screening software can help manage these checks across different sources. The lists used may vary based on applicable rules and risks.
A match does not automatically mean that a customer has done anything wrong. Firms need to check the result, confirm whether it belongs to the customer, and decide whether further action is needed.
When a review finds activity that requires a report under the law, the firm may need to file a report. In Pakistan, the FBR monitors AML/CFT compliance for covered DNFBPs and handles requirements related to suspicious transaction and suspicious activity reporting to the Financial Monitoring Unit.
Firms also need to keep clear records as part of their AML compliance process. These records can include customer information, verification and screening results, risk assessments, transaction details, investigation findings, decisions, and supporting documents.
Firms also need to monitor customers after onboarding as part of their AML compliance process. Customer information and risk levels can change over time, while new transactions can provide additional information for review.
Risk indicators are one of the most practical parts of an AML compliance program. They help firms identify situations that deserve closer attention.
Certain customer behaviors and information may indicate that a transaction requires closer review.
For corporate customers, the firm may need to look beyond the immediate entity and understand its ownership and control structure.
Firms should pay closer attention to transactions that show signs such as:
These signs do not necessarily mean that a transaction involves financial crime. Firms should consider the customer’s situation and the transaction details before deciding whether further checks are needed.
The source of funds can raise questions when there are:
Geographic factors that may require attention include:
Customer behavior can raise concerns in situations such as:
The correct response is not to label the customer as a money launderer. Instead, the indicator should lead to
review → investigation → documentation → escalation where appropriate.
Once risk indicators are identified, firms need a consistent way to assess them. This is where a structured risk-scoring process can support AML compliance.
A risk engine can bring together information such as:
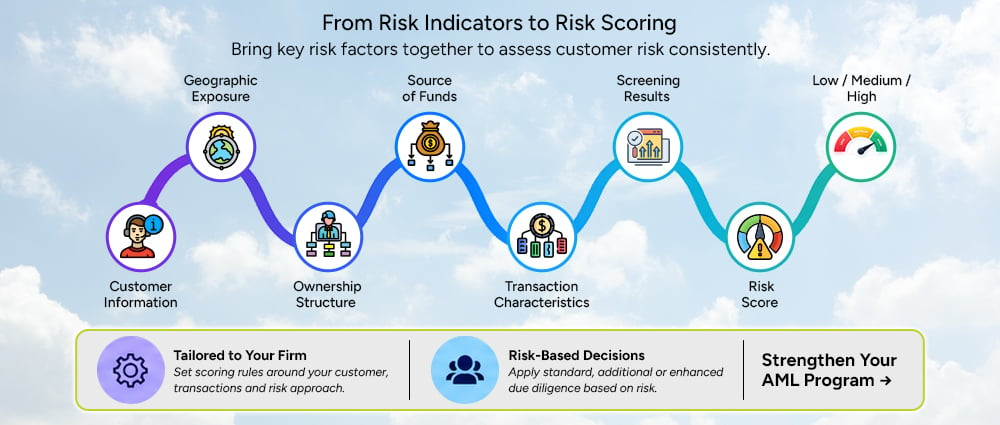
Risk scoring can differ between firms because their customers, transactions, and regulatory requirements are not always the same. Firms can set rules based on their own risk approach and change them as their requirements change.
For a low-risk customer, standard due diligence may be enough. A medium-risk customer may need additional checks, while a higher-risk case may need enhanced due diligence and manual review.
Technology can organize these decisions, but human reviewers should remain responsible for interpreting exceptions and making appropriate compliance decisions.
Spreadsheets, email approvals, separate screening tools, and manually maintained customer records can become difficult to manage as a real estate firm’s activity grows. AML case management software can bring case information into one place, so compliance teams do not have to check several sources before making a decision.
This can result in:
AML automation software can connect these activities into a single workflow. Firms can set up the software based on their requirements, regulatory obligations, existing systems, and verification services.
The process can then move through the following steps:
The system collects the information required to establish the customer’s identity and relationship with the business.
Identity and relevant documentation are verified using connected verification services or internal processes.
The system can screen relevant individuals and entities against applicable:
The system collects the information required to establish the customer’s identity and relationship with the business.
The system uses customer details, location, ownership, source of funds, and transaction information to determine the level of risk.
The system reviews transaction and activity data to identify any activity that may indicate a risk.
An alert is created when activity may need further review.
Compliance staff can review the alert, add supporting information, and record their findings and decisions.
Cases that need additional attention can be forwarded to the compliance staff for review.
The system maintains records of alerts, investigations, decisions, supporting evidence, approvals, and escalations.
This approach makes AML compliance a connected process rather than a series of isolated checks.
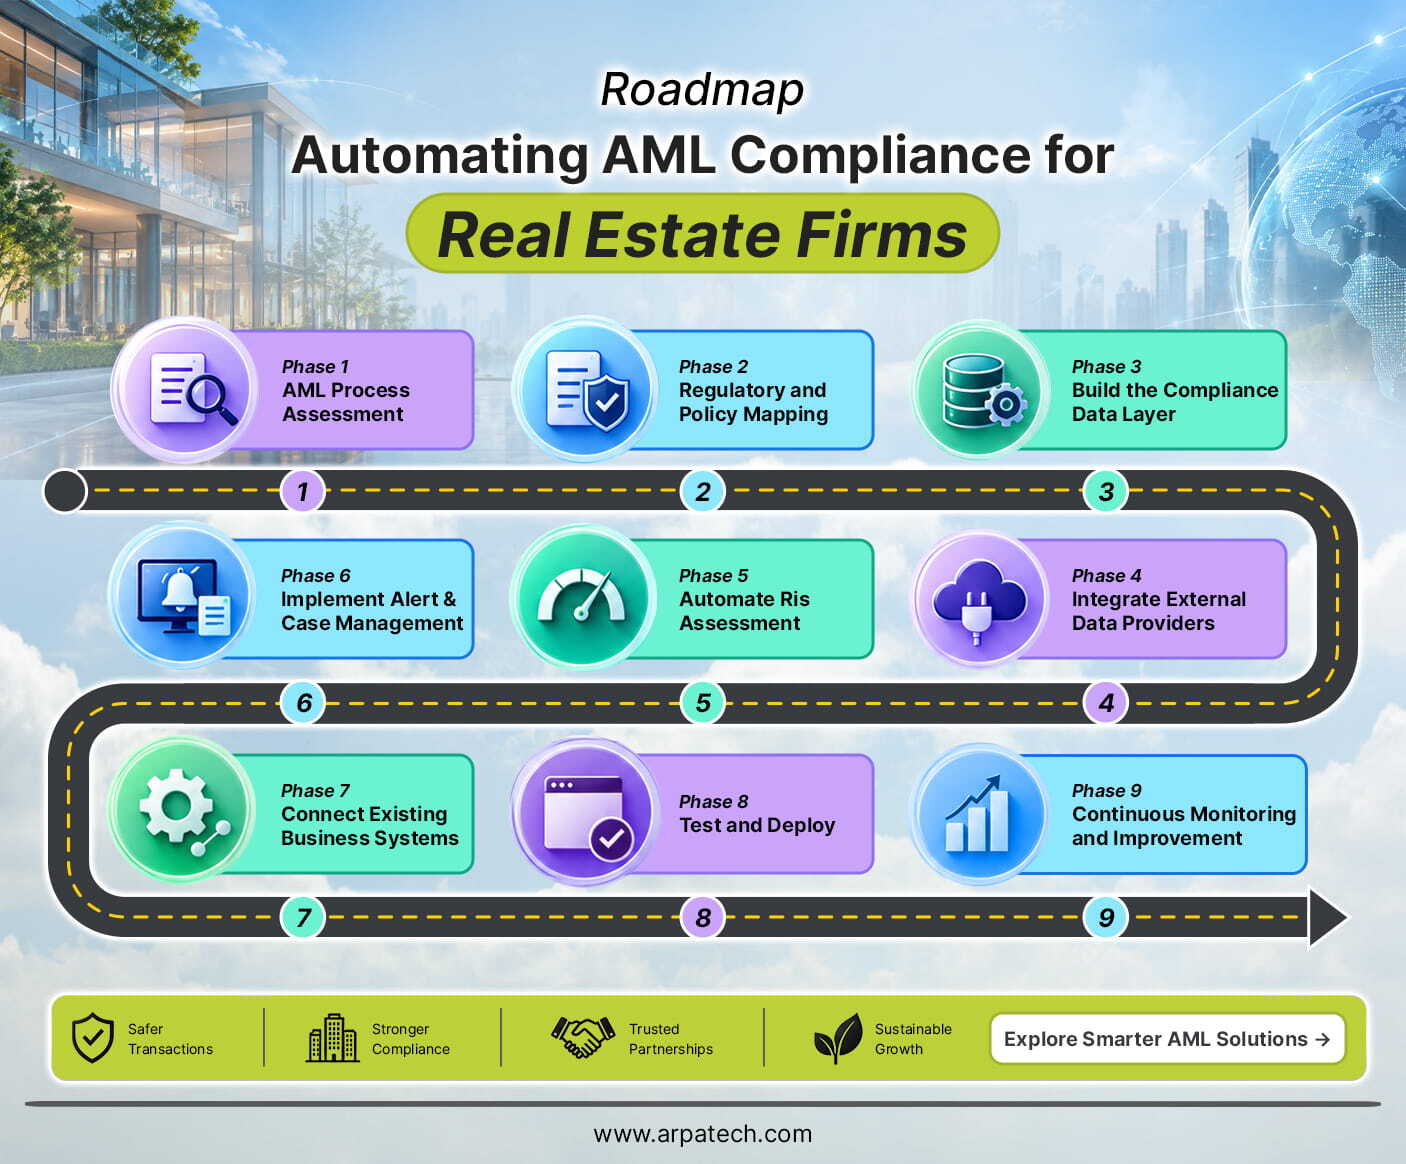
Firms should start automation by reviewing their existing compliance process rather than choosing software based on its features.
The technology partner first reviews the existing process, including:
This identifies where automation can provide practical value. AML automation opportunities may include repetitive checks, data collection, screening, monitoring, and case administration.
Applicable legal requirements and internal AML policies are translated into technical requirements for:
For Pakistan-based firms, this mapping should take account of the applicable AML Act, FBR AML/CFT regulations, and relevant FBR guidance for the real estate sector. FBR maintains a dedicated section for AML/CFT legislation and regulations applicable to Designated Non-Financial Businesses and Professions.
Relevant information can be managed through a single system:
Customer → Identity → Entity → UBO → Transaction → Screening → Risk → Case
This gives firms a complete view of compliance information without requiring them to search through separate systems.
Depending on requirements, integrations may include:
Configurable rules can evaluate customer and transaction information and assign an initial risk category.
The compliance team should be able to update the rules as the firm’s risk methodology changes.
Alerts should follow a clear process from initial review to closure:
Alert → Review → Evidence → Decision → Escalation → Closure
Compliance staff can review cases, add evidence, record decisions, and handle escalations in one place instead of using separate emails and spreadsheets.
An AML platform does not necessarily need to replace existing business applications. It can integrate with systems such as:
This allows relevant information to move between systems without requiring staff to repeatedly enter the same data.
Before deployment, test the system using realistic situations such as:
The testing should cover how the system works and whether its decisions follow the firm’s compliance rules.
Automation does not mean the system can be left untouched after launch.
Firms should regularly review:
This creates opportunities to refine the workflow while keeping human oversight in place.
A practical platform can bring the main parts of AML compliance into one environment.
| Capability | What it helps with |
|---|---|
| Digital onboarding | Collect and organize customer information |
| Identity verification | Verify the customer’s identity |
| Document verification | Check submitted documents |
| UBO identification | Identify people who own or control a business |
| Sanctions screening | Check customers against sanctions lists |
| PEP screening | Check for politically exposed persons |
| Adverse media screening | Check for relevant negative news |
| Risk scoring | Assess customer and transaction risk |
| Transaction monitoring | Check transactions for unusual activity |
| Alert management | Review and assign potential risk alerts |
| Case management | Investigate cases and record decisions |
| Audit trails | Keep a record of compliance activity |
| Reporting | Prepare internal and regulatory reports |
| Integrations | Connect the platform with existing business systems |
The platform should also provide appropriate access controls, audit logging, data protection, and role-based permissions. These controls are particularly important because AML systems handle sensitive customer and transaction information.
When choosing an automation partner, it’s important that they understand your compliance needs and can turn those needs into effective software. A good partner should provide:
The software should support the way the firm already manages compliance while allowing the process to improve where needed. A technology partner should understand the company’s current workflows before suggesting how the software should function.
Managing AML compliance manually can create a growing workload for real estate firms. Automation can bring customer checks, screening, risk assessment, monitoring, and case management into one process, making risk management easier to manage as the business grows.
Automation can create a more structured approach by connecting customer information, screening, beneficial ownership, risk assessment, transaction monitoring, alerts, investigations, and audit records in one workflow.
The goal is not to remove people from the process. AML compliance will always require human judgment, but AML compliance software can reduce the administrative work that would otherwise remain manual. AML compliance solutions can support these processes while keeping compliance staff involved in reviews and decisions.
Ready to automate your AML compliance process? Talk to Arpatech about building a secure and scalable solution for your real estate business.
In real estate, AML compliance covers the measures firms use to identify and manage money laundering and other financial crime risks. These measures can include customer due diligence, beneficial ownership checks, sanctions and PEP screening, risk assessment, transaction monitoring, record-keeping, and suspicious activity reporting where required.
AML requirements vary based on where a firm operates and the type of real estate work it carries out. In Pakistan, the FBR oversees AML/CFT requirements for real estate agents and has issued guidance on the measures they need to follow.
Real estate deals can involve large amounts of money, companies, third parties, financing arrangements, and buyers or sellers from different countries. This can leave firms with limited information about the actual owner and the origin of the funds.
AML compliance gives firms a process for checking this information and reviewing activity that raises concerns. It also helps them keep records and meet the requirements that apply to their business. FATF identifies real estate as a sector that can be misused for money laundering and recommends using a risk-based approach.
Real estate firms may notice several signs during AML reviews, such as unclear ownership, unusual payment arrangements, unexplained funds, activity that does not fit the customer’s profile, third-party payments, complex cross-border transactions, or attempts to avoid compliance checks.
A risk indicator alone does not prove money laundering. It gives compliance staff a reason to look more closely at the customer or transaction and decide whether further investigation is needed.
Yes. AML compliance includes several tasks that software can handle, from collecting customer information and checking identities to screening, risk assessment, transaction monitoring, and case management.
The final decisions still require compliance staff. They can review unusual cases, consider the evidence, record their findings, and decide whether the matter needs escalation or reporting.
AML software can keep customer information, screening results, risk assessments, alerts, investigations, and audit records in one place. Compliance teams do not have to move the same information between spreadsheets, emails, databases, and separate screening systems.
The software can also use configurable rules and role-based workflows. Firms can adjust these settings to match their policies and regulatory requirements instead of following a fixed process.
Real estate firms can use AML automation platforms to handle tasks such as digital onboarding, identity and document verification, UBO identification, sanctions and PEP screening, adverse media checks, risk scoring, transaction monitoring, alert management, case management, reporting, and audit trails. The platform can also connect these activities with existing business systems.
Along with these functions, firms need to consider security, user access, audit records, configurable rules, integrations, and ongoing support. These factors help determine whether the platform can work with the firm’s existing compliance process and requirements.
No. KYC deals mainly with identifying and verifying customers and, for legal entities, finding out who owns or controls them. AML covers a wider range of financial crime risks, including customer activity, transactions, ownership, source of funds, and changes over time.
KYC is one part of AML compliance, but it does not cover every AML requirement. Firms may still need to assess risk, monitor activity, and carry out further checks after onboarding.
Maheen Jilani
Sep 24, 2026

Top 10 Instant Loan Apps in the UAE: Digital Loans, Eli...
Need an instant loan in UAE without visiting a bank branch? Digital lending has changed how UAE residents apply for personal loans, salary-linked finance and short-term cash. Several UAE banks and regulated fintech providers now allow eligible customers to complete applications through mobile apps, with some products offering decisions or disbursement within minutes.
But there is an important distinction: “instant loan” does not mean guaranteed approval or guaranteed immediate cash. Approval depends on factors such as income, employment, Emirates ID, credit history, existing liabilities and the lender’s internal assessment.
For this guide, We researched current UAE provider pages, product terms and official announcements available in September 2026 rather than relying solely on generic loan-app lists.
Important: ARPATECH does not provide loans. Loan rates, fees, limits and eligibility can change. Always check the provider’s current Key Facts Statement (KFS), terms and conditions before accepting financing.
|
# |
App / Provider | Digital Borrowing Option | Indicative Amount* |
Digital Experience |
|
1 |
CashNow | Short-term personal cash loan | Up to AED 30,000 depending on product |
App-based application |
| 2 | du Pay | Flexi Cash Loan | Up to AED 5,000 |
In-app cash loan |
|
3 |
Mashreq NEO | NEO Credit | Up to AED 150,000 |
5-minute application |
| 4 | CBD Mobile | Quick Loan | Up to AED 150,000 |
Digital application |
|
5 |
Arab Bank Arabi Mobile | Instant Loan | Up to AED 300,000 for eligible customers |
Credit to account within minutes |
|
6 |
Liv. | Personal Loan | Up to AED 200,000 |
Apply through Liv app |
|
7 |
DIB alt | Personal Finance / FlexiSalary | Up to AED 13,000 for FlexiSalary |
Digital application |
|
8 |
ADIB Mobile | Express Finance | Depends on eligibility |
Digital finance application |
|
9 |
FAB Mobile | Personal Loan / digital loan journeys | Up to AED 5 million for applicable products |
Paperless digital journeys |
|
10 |
ruya | Shariah-compliant Personal Finance | Depends on eligibility |
Apply through ruya app |
*Amounts are advertised maximums or product-specific limits, not guaranteed approvals. Eligibility and final offers vary by customer.

CashNow is one of the more clearly focused mobile cash-loan platforms for UAE residents. Its current Key Facts Statement identifies the lender as Botim Finance LLC and describes Standard and Professional Loans as conventional personal loans offered through the CashNow mobile application.
According to the current CashNow information, the Standard Loan can provide up to AED 8,000, while the Professional Loan can provide up to AED 30,000, subject to eligibility and credit assessment. Standard loans have terms of up to six months, while professional loans can run for up to 12 months.
CashNow’s UAE Google Play listing was updated in August 2026 and identifies Botim Finance LLC as the developer, while stating that the company is licensed by the Central Bank of the UAE.
Best suited for: UAE residents looking for relatively small, short-term cash borrowing through a dedicated loan app.

One of the biggest developments in the UAE’s digital lending market in 2026 is the launch of Flexi Cash Loan through du Pay.
du announced the product on July 30, 2026, describing it as a new digital lending service that provides eligible du Pay customers with cash loans of up to AED 5,000 directly through the app.
The service is being rolled out in phases, so it is important not to assume that every du Pay customer currently has access.
Best suited for: Eligible du Pay users who need a relatively small amount of short-term cash.

Mashreq’s NEO Credit is a digital personal-loan product designed for customers who want to complete the borrowing process without a traditional branch visit.
Mashreq currently advertises loans of up to AED 150,000, with repayment periods from 2 to 48 months. The bank says the application takes approximately five minutes and requires no physical documentation.
The current published interest-rate range is 9.49% to 26.49% per year, depending on the customer’s profile and loan duration. Mashreq states that a minimum monthly salary of AED 5,000 is required.
Best suited for: Borrowers looking for a larger personal loan through a mainstream UAE banking app.

Commercial Bank of Dubai offers Quick Loan through the CBD Mobile app.
The bank describes the product as a 100% digital application with instant approval in minutes for eligible customers. CBD says applicants can request up to AED 150,000, with repayment of up to 48 months.
A notable feature is that the bank says applicants do not need to transfer their salary to CBD and that the only document required for the digital application is an Emirates ID. UAE PASS is used during the application process.
Best suited for: Eligible UAE residents looking for a digitally processed bank loan without necessarily transferring their salary to CBD.

Arab Bank’s Instant Loan is available through its Arabi Mobile app for eligible customers.
The current UAE product page says eligible Elite customers can borrow up to AED 300,000, while Arabi Premium customers can borrow up to AED 200,000. The maximum repayment period is 48 months.
Arab Bank says the money can be credited to the customer’s account within approximately 15 minutes after the disbursement request, subject to completing the required checks and contracting process.
There is an important eligibility limitation: applicants must be salaried customers with an existing Arab Bank relationship of at least six months.
Best suited for: Existing eligible Arab Bank customers who want a higher-value digital personal loan.

Liv., the digital banking brand from Emirates NBD, offers personal loans through the Liv app.
The current product page advertises loans of up to AED 200,000, with repayment periods ranging from 12 to 48 months. Liv currently publishes rates from 9.99% to 12.99% per annum, although the actual rate depends on the customer’s circumstances.
The application is designed to be completed digitally through the Liv app.
Best suited for: Customers who prefer a digital-bank experience for a conventional personal loan.

DIB’s alt is its digital banking platform, providing access to personal finance through mobile and online channels.
DIB says alt provides more than 135 digital banking services, including applying for personal finance.
For people specifically looking for smaller, short-term access to money, DIB FlexiSalary is particularly relevant. DIB currently advertises financing of up to AED 13,000, with zero processing fees and fixed profit amounts ranging from AED 80 to AED 200. The minimum salary is AED 2,000, but the product is available only to selected pre-approved customers with an existing salary-transfer relationship.
Best suited for: Existing DIB customers seeking digital Islamic financing or salary-support finance.

ADIB’s mobile application provides access to Express Finance and other personal financing products.
ADIB describes Express Finance as financing that can be obtained with minimal paperwork through the mobile application. Customers can apply for personal finance from home if they meet the eligibility requirements.
ADIB has also reported that its digital platform supports instant journeys with straight-through processing across areas including personal finance.
Best suited for: Customers seeking Shariah-compliant personal finance through a UAE banking app.

First Abu Dhabi Bank offers personal loans to UAE nationals and expatriates, while its FAB Mobile app provides digital access to banking and loan services.
In August 2026, FAB announced a new fully automated, paperless personal-loan journey integrated with the UAE Federal Authority for Government Human Resources. The system can retrieve employment and salary information digitally for eligible customers within the integrated employer network.
FAB’s current personal-loan information shows loan amounts of up to AED 5 million for applicable products, with rates and eligibility depending on the customer’s segment and product.
Best suited for: Existing or eligible FAB customers who want a larger traditional bank loan with an increasingly digital application process.

ruya is a UAE digital Islamic banking platform offering Shariah-compliant personal finance through its app.
The current ruya Personal Finance page says customers can view an indicative instalment estimate instantly and apply through the ruya app. The advertised profit rate starts from 2.90% flat per annum, equivalent to approximately 5.49% fixed reducing per annum.
The current minimum salary is AED 5,000, and applicants must be at least 21 years old. ruya also lists documents including Emirates ID, passport, salary documentation and, where required, bank statements.
Best suited for: UAE residents looking for digital Shariah-compliant personal finance.
This is where many online loan articles become misleading. An instant loan app generally means the application, identity verification, credit assessment, contract and/or disbursement can be completed digitally and quickly. It does not mean that every applicant will receive money immediately.
So, speed describes the process, not a guaranteed approval outcome.
The UAE’s official government portal states that personal loans generally cannot exceed 20 times the borrower’s salary or total income, while the repayment period cannot exceed 48 months. Monthly deductions are generally limited to 50% of salary.
There is also a broader regulatory reason to look beyond advertised approval speed.
As of September 13, 2026, the Central Bank of the UAE’s updated responsible-financing rule requires financial institutions to assess whether a customer can service the credit and examine the customer’s credit record before granting credit.
That means an app saying “instant loan” should never be interpreted as “loan without financial assessment.”
The underlying UAE credit market has remained active.
According to the Central Bank of the UAE’s Q3 2025 Credit Sentiment Survey, demand for personal loans continued to show strength, with a net balance of +18.6 percentage points. Financial institutions expected personal-loan demand to strengthen further, with a forward net balance of +28.4 percentage points.
The CBUAE’s Financial Stability Report also reported that UAE bank retail credit increased 16.8% in 2024, while personal loans increased 9.4% during the year 2025.
These figures help explain why digital lending and mobile banking have become increasingly important parts of the UAE financial-services ecosystem.
Before submitting an application, compare these factors rather than choosing an app simply because it advertises “instant approval.”
An app may be a bank, a finance company, a fintech platform, a payment company or simply a technology interface.
The Central Bank of the UAE maintains an official register of regulated financial institutions and explains that financial institutions carrying out regulated activities require CBUAE authorisation. Check the CBUAE licensing register
Don’t look only at the advertised annual interest or profit rate.
Check:
A longer repayment period can reduce the monthly instalment while increasing the overall amount paid.
The difference between AED 2,000, AED 5,000, AED 7,000 and AED 10,000 minimum salary requirements can eliminate some products immediately.
Some digital loans do not require salary transfer to the lending bank, while others are specifically tied to an existing salary relationship.
UAE lenders use credit information when assessing applications. A customer’s existing liabilities and repayment history can affect eligibility and pricing.
These three categories are often mixed together online, but they are different.
|
Product |
What you receive |
Typical purpose |
|
Personal loan |
Cash/financing |
Larger expenses |
|
Short-term cash loan |
Cash |
Emergency or short-term needs |
|
Salary advance |
Part of expected salary |
Bridging a payday gap |
|
BNPL |
Purchase financing |
Paying for a specific purchase |
|
Credit-card loan |
Cash against available credit |
Short-term liquidity |
Tabby has expanded its UAE financial-services offering and received a UAE Stored Value Facilities licence from the CBUAE in April 2026, but its core consumer proposition should not automatically be treated as the same thing as a cash personal-loan product.
That distinction matters when someone searches Google for “instant cash loan UAE” but lands on a BNPL service.
At ARPATECH, we approached this article from a technology and digital-services perspective as well as a consumer-information perspective.
ARPATECH is a global IT services company with a presence in the UAE, working across software development, mobile applications, cloud, DevOps, cybersecurity and digital transformation.
For this research, we focused on providers that currently have a functioning UAE digital borrowing journey and checked official provider information, current product pages, UAE regulatory information and recent 2026 announcements.
We also deliberately separated:
That matters because a page claiming that every financial app offering “pay later” is an instant loan app can create a misleading comparison.
For a technology company such as ARPATECH, the growth of digital lending also demonstrates how mobile applications, automated identity verification, API integrations, digital KYC, credit decisioning, cloud infrastructure and secure financial APIs are changing financial services in the UAE.
The UAE now has a broad range of digital borrowing options, from dedicated short-term lenders such as CashNow and the newly launched du Pay Flexi Cash Loan to fully digital bank products from Mashreq, CBD, Liv., DIB, ADIB, FAB, Arab Bank and ruya.
The important question is not simply “Which app gives money fastest?”
How much can I borrow + what will I actually pay + how long will I repay it + am I eligible + who is providing the financing + is the provider properly regulated?
That approach is particularly important as UAE regulators continue strengthening responsible-financing requirements and the country’s financial sector becomes increasingly digital.
Several providers offer digitally processed loans or financing. Current examples include CashNow, du Pay Flexi Cash Loan, Mashreq NEO Credit, CBD Quick Loan and Arab Bank’s Instant Loan. Actual approval and disbursement depend on eligibility and the lender’s assessment.
The minimum amount depends on the product. Short-term products such as du Pay Flexi Cash Loan and DIB FlexiSalary are aimed at smaller borrowing needs, while bank personal loans can provide substantially larger amounts.
Yes, some products are available to UAE expatriate residents. However, eligibility differs considerably by lender, salary, employer, residency status, existing banking relationship and credit profile.
Many UAE digital lending products use Emirates ID as part of identity verification. For example, Mashreq NEO Credit and CBD Quick Loan specifically reference Emirates ID in their application requirements.
Some products allow this. Mashreq NEO Credit says salary transfer is not required, while CBD Quick Loan also states that salary transfer to CBD is not required.
Credit and financing activities in the UAE are regulated, and the CBUAE maintains an official register of licensed financial institutions. Consumers should verify the provider and understand who is actually providing the credit before submitting sensitive financial information.
You should not assume so. The CBUAE’s responsible-financing rules require financial institutions to assess a customer’s ability to service credit and examine credit records before granting credit.
Aaqil Abdul Rehman
Sep 17, 2026

How KYC Software Protects Real Estate Transactions and ...
Buying or selling property involves far more than signing an agreement. Real estate transactions can involve large amount of money, sensitive personal documents, multiple parties, companies, agents, and complicated ownership structures. For a real estate business, knowing a customer’s name is not enough. It requires confidence that the person is genuine, the documents are legitimate, and the parties involved have the right to participate in the transaction.
With so much depending on the identity of the people involved, real estate businesses need a verification process they can rely on. KYC software helps manage this process digitally, from collecting customer details and checking identity documents to screening databases and maintaining records. Custom software development services can help integrate these verification processes with the systems a business already uses.
A reliable verification process also helps address one of the bigger risks in real estate: money laundering. The Financial Action Task Force notes that real estate is frequently used for money laundering, with risks often linked to corporate vehicles, complex financing arrangements, and hidden ownership. For real estate professionals, these risks make careful customer verification an important part of the process.
Key Takeaways
What We Will Cover
Know Your Customer, commonly called KYC, is the process of identifying and verifying a customer and understanding enough about them to meet applicable compliance requirements. In real estate, this can apply to buyers, sellers, landlords, tenants, investors, developers, corporate clients, agents, intermediaries, and other parties involved in a transaction.
For an individual, the information collected may include their full legal name, date of birth, residential address, contact details, government-issued identification, passport, or proof of address. These requirements may change depending on the location, transaction, customer type, and relevant laws.
For a company, the process can go further. A real estate business may need company registration details, business information, authorized representative details, and information about the individuals who own or control the entity.
This is why KYC is more than collecting documents. KYC identity verification requires the business to establish whether the information is authentic, consistent, and sufficient for the relevant compliance process.
A well-designed KYC software workflow can bring this information into one place, reducing the need for staff to collect and verify every piece of information manually.
The way real estate transactions are structured can make fraud and financial crime harder to detect. Properties often involve large sums of money, several parties may be involved in a deal, and ownership may sit behind companies or other legal entities.
One of the risks that comes with these transactions is identity fraud. An individual may try to take part in a deal using someone else’s identity or altered documents. While manual verification can identify basic issues, more advanced fraudulent attempts cannot be identified manually.
The problem is not limited to false identities. False or changed documents can be used to mislead businesses during a transaction. Without proper verification, these documents may be accepted, allowing the person to move further into the transaction before anyone notices the problem.
Checking documents is only part of the process. Hidden ownership can also make a transaction difficult to assess, especially when a property is held through a company or another legal entity. The person handling the deal may not be the one who actually controls or benefits from the property.
These risks can affect more than the transaction itself. A real estate company linked to a fraudulent or suspicious deal may face financial losses, regulatory scrutiny, and a loss of customer trust.
That is where KYC software can help. It does not remove these risks, but it gives businesses a more organized way to verify customers, check documents, and manage the information involved in each transaction.
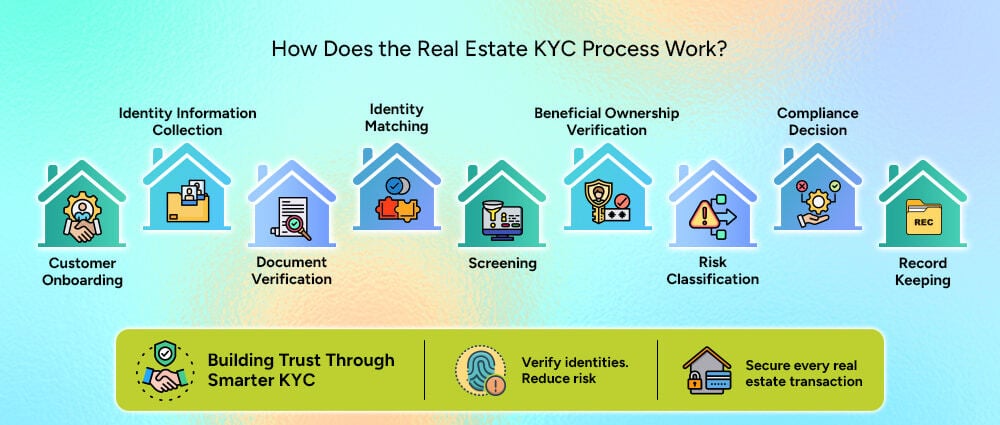
A good KYC process should be structured around the company’s customer journey rather than treated as a separate administrative task.
To start an application or transaction, the customer provides the needed information for verification. Digital forms can help users fill out the required fields and reduce incomplete submissions.
The business collects relevant information such as:
The KYC software can organize this information and pass it to the next stage without requiring employees to re-enter the same data.
After the customer submits a document, the system checks the details to make sure everything is in order. This can include the document type, expiry date, validity, and signs of alteration. OCR can also read the information on the document and reduce manual data entry.
After checking the document, the system makes sure it belongs to the customer. It can compare the customer’s face with the photo on their ID and check that they are a real person, not a photo or recording.
The system can check customer information against sanctions lists, PEP databases, watchlists, adverse media sources, and other relevant databases. If a match is found, the business can review the customer before moving forward.
When the customer is a company, the business needs to know who is behind it. This is important when the company is buying, selling, or holding a property.
The information collected can be assessed against predefined rules to determine whether a customer presents a low, medium, or high level of risk.
After the verification and screening checks, the business can decide how to proceed with the customer. The result may be an approval, a request for additional information, a manual review, or a rejection or escalation.
Businesses need to keep a record of the checks carried out during verification. This can include documents, screening results, decisions, timestamps, and actions taken by reviewers. The records should be stored securely and kept as long as required.
This makes KYC software useful beyond checking a customer’s identity. It also helps businesses keep track of what was checked and what happened during the process.
Manual KYC may work when a real estate business handles a small number of customers. Problems usually appear as transaction volume increases.
An employee may receive an ID by email, download it, check the document, enter the customer’s details into another system, perform separate database searches, record the outcome in a spreadsheet, and later search through emails when someone asks for the verification history.
When these tasks are handled manually for hundreds or thousands of customers, they can become difficult to manage. Businesses may face problems such as:
The problem is not necessarily that employees cannot perform these tasks. It is that repetitive processes consume time and create more opportunities for inconsistency. KYC software can take care of routine checks, leaving employees to focus on cases that need a closer review.
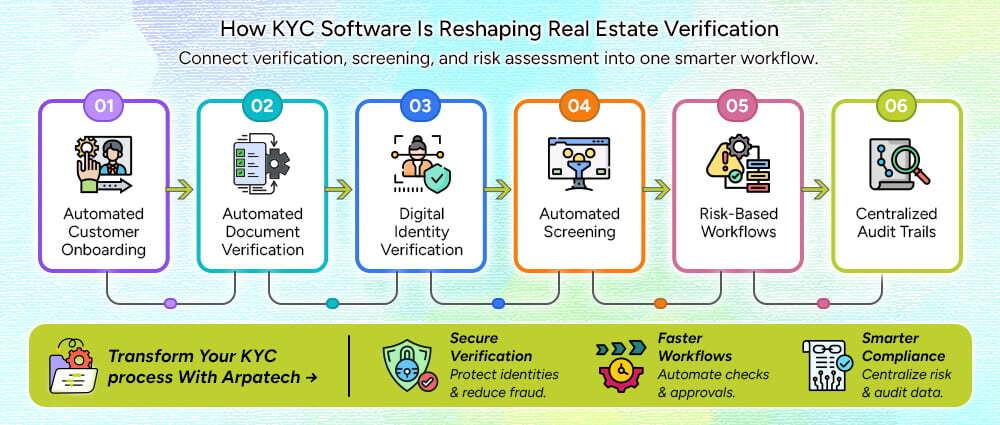
The strongest use of KYC software is not simply replacing a manual ID check. It is connecting several verification activities into one workflow.
Digital onboarding forms can collect information based on customer type. A buyer, corporate investor, or tenant can be presented with the fields and documents relevant to their situation.
Document recognition and OCR can extract information from IDs and supporting documents. The system can then compare that information against the customer’s submitted details and flag inconsistencies.
Identity verification services can be integrated into the workflow for facial matching, liveness checks, and other digital verification methods.
APIs can connect the platform with appropriate sanctions, PEP, watchlist, and adverse media providers. Instead of employees performing each search separately, results can flow into the customer’s case.
Rules can be configured to determine what happens next.
For example:
Low risk → automated approval
Medium risk → additional information
High risk → compliance team review
This approach helps teams spend their time on cases that require their attention.
Each verification case can have a record of the information submitted, documents checked, screening results, reviewer actions, and final decision. This gives the business a clear record of what happened during the verification process. This creates a much clearer history than scattered emails and spreadsheets.
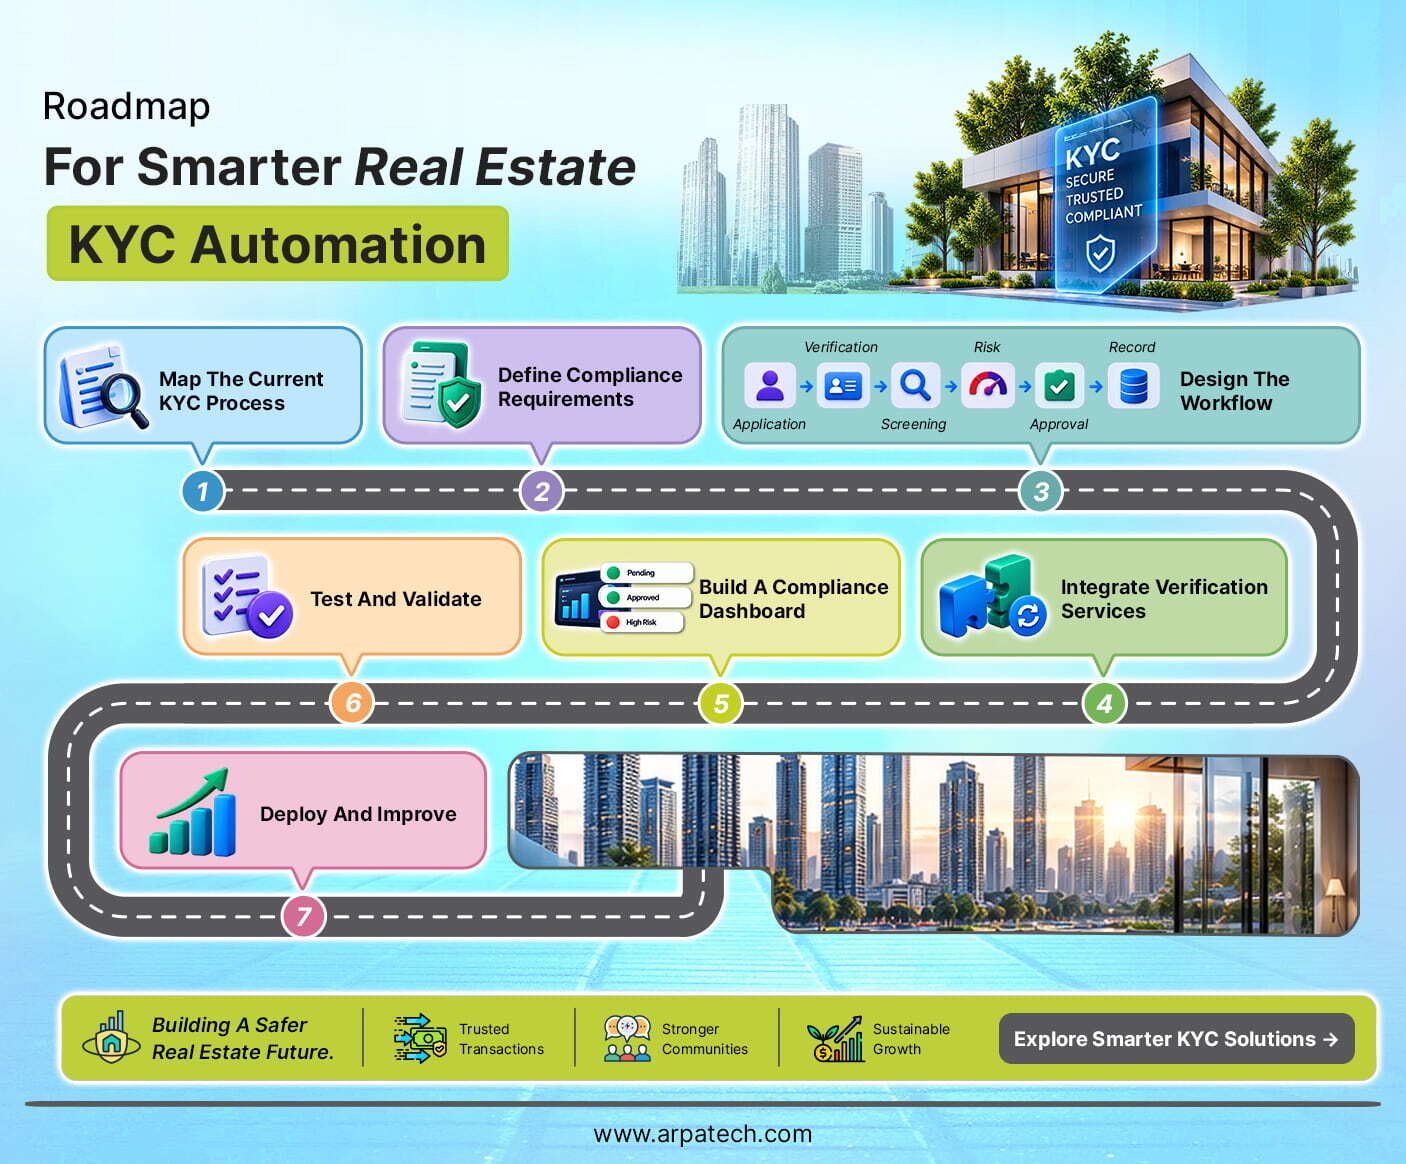
Building KYC software should begin with the existing business process, not with technology.
Start by documenting how a customer moves from application to approval. Look at the information and documents collected, the checks carried out, and the people involved at each stage.
Going through these steps can help you find unnecessary work and decide where automation would be useful.
Make a list of the rules that apply to the business and the customers it deals with. Note what information and documents need to be collected, which risk checks are needed, how long records should be kept, and when a case should be sent for further review.
The software should be built around these rules. It can help apply the company’s compliance process, but it should not make its own legal decisions.
Map the complete journey:
Application → Data Collection → Identity Verification → Screening → Risk Assessment → Review → Approval → Record Keeping
The goal is to make every stage clear, including what happens when a check fails.
Depending on the business model, integrations may include:
The technology partner should design these integrations around the company’s workflow rather than treating each service as an isolated tool.
Compliance teams need visibility into what is happening.
A dashboard can show:
This gives the team a quick view of the cases that are still in progress or need action.
Run different cases through the workflow, including incomplete applications, failed documents, identity mismatches, wrong alerts, risk cases, API failures, and manual decision changes. Review the results and see if anything needs to be changed. Make those changes before the workflow is put into use.
After testing the workflow, launch it. Monitor how long it takes to verify, how many customers complete the process, how often incorrect alerts occur, and how many cases need a manual review. Also, check for any compliance issues during this process.
Review what you find and make changes where the workflow is slow, causes problems, or needs more automation.
Selecting a technology partner is about more than finding a platform that can verify an ID. Look for a partner that can provide:
The partner should also understand that every real estate business has different customers, systems, risk policies, and operational processes.
The right KYC software should fit into that environment rather than forcing the business to redesign everything around a rigid platform.
KYC should not be treated as paperwork that simply needs to be completed before a property transaction can move forward. Done properly, it gives real estate companies a clearer understanding of who they are dealing with and creates a structured way to manage identity and transaction risks.
The right KYC software handles the main verification tasks in one place, from checking identities and documents to screening customers and reviewing risk. This makes the process easier to manage and gives teams a clear view of each customer’s verification status.
KYC helps real estate businesses verify who they are dealing with, but customer verification is only one part of financial crime compliance. Firms also need to understand transaction risks, identify suspicious activity, and take the right action when something looks unusual. This is where AML compliance becomes important.
If your real estate business still relies on disconnected tools or manual verification, Arpatech can help you build a secure, scalable solution around your existing workflows. Discuss how an automated KYC workflow can fit into your business.
Choose KYC software that keeps data secure and fits the way your business handles verification. It should connect with your existing CRM and compliance tools, while giving your team the ability to review risky or unusual cases.
Identity verification software checks a customer’s ID, matches their face with the photo on the document, and checks if a real person is present. The verified information can then be sent to the KYC software for screening and risk checks.
Automated KYC systems can help spot missing information, document issues, identity mismatches, and screening alerts during verification. Cases that need more attention can then be sent to the compliance team for review.
KYC software gives businesses a simpler way to check who they are dealing with and whether there are any risks involved. In real estate, this matters because a single transaction can involve large amounts of money, several people, and companies that may hide who owns the property.
In 2026, software needs to do more than handle basic tasks. It should be secure, scalable, and able to support automation, AI, and real-time data. For businesses handling customer information, KYC and AML compliance should also be part of the software.
Yes, the same KYC software can handle both individuals and businesses when it includes KYB capabilities. For businesses, it can check company information, documents, ownership details, and identify the UBOs behind the company. It can also help businesses understand more complex ownership structures.
Maheen Jilani
Sep 15, 2026

Before we begin, please solve this quick math check to confirm you're human, and you'll be all set to start chatting with our AI assistant.
Stay connected with us to receive the latest information, updates, and insights from our world of innovation.
By entering your email address you will receive promotional updates.


© 2026 ARPATECH (ADVANCED RESEARCH PROJECTS & TECHNOLOGY)


